
Callbacks are a roofer’s worst nightmare. They cost time, money, and hard-earned reputation. A dripping end cap is one of the most common—and frustrating—culprits behind those unwanted return trips. While a quality sealant is essential, it’s not enough to create a lasting bond on its own. It needs a strong, mechanical lock to hold up against years of rain, snow, and debris. This is where a dedicated gutter end cap crimper becomes a non-negotiable part of your toolkit. This simple hand tool creates the secure, professional fit that prevents failures and ensures your work stands the test of time. In this guide, we’ll cover everything from choosing the right model to mastering the technique for a perfect, leak-proof seal every single time.
Key Takeaways
- The Crimp Provides Strength, the Sealant Provides the Seal: A gutter end cap crimper creates the essential mechanical lock that holds the end cap firmly in place. This physical bond is crucial because it allows your sealant to cure properly and form a completely waterproof barrier without stress.
- Invest in Professional-Grade Features: When choosing a crimper, prioritize durability and function. Look for tools made from hardened steel with protective coatings, comfortable non-slip grips to reduce fatigue, and adjustability to handle different gutter sizes and materials.
- A Consistent Process Prevents Callbacks: A leak-proof finish depends on proper technique. Always dry-fit the end cap, clean both surfaces, apply sealant before crimping, and finish with a final bead of sealant on the inside seam for a guaranteed watertight connection.
What is a Gutter End Cap Crimper?
If you’ve ever installed a gutter system, you know that getting a perfect, leak-proof seal on the end caps is non-negotiable. That’s where a gutter end cap crimper comes in. This specialized hand tool is designed for one specific, crucial job: to crimp, or squeeze, the gutter end cap securely onto the gutter channel. A proper crimp ensures a snug fit that prevents water from leaking out the sides, maintaining the integrity of the entire drainage system.
Think of it as the final, professional touch that locks everything in place. Without a solid crimp, you’re relying solely on sealant, which can fail over time. Using a dedicated crimper creates a mechanical bond between the two pieces of metal, giving you a much more durable and reliable connection. It’s one of those essential [gutter tools](https://www.stortz.com/product-category/roofing-tools/sheet-metal- roofing-tools/gutter-tools/) that separates a quick fix from a long-lasting, professional installation.
Its Core Components
A quality gutter end cap crimper is built to withstand the daily demands of the job site. You’ll find they are typically constructed from tough, hardened steel for maximum durability and longevity. The business end of the tool—the jaws that do the crimping—needs to be strong enough to consistently form metal without dulling or deforming. Many professional-grade crimpers also feature protective coatings, like nickel plating or a black oxide finish, on the metal parts. This isn’t just for looks; it provides critical resistance against rust and wear, ensuring your tool stays in top condition season after season.
How It Creates a Seal
The magic of a crimper lies in its simplicity. When you squeeze the handles, the tool’s jaws press into the metal, creating a series of small, uniform dents or dimples. This action effectively fastens the end cap to the gutter trough. This mechanical lock is what provides the strength to hold the components together against the force of water and debris. While you’ll still use a sealant to make the joint completely waterproof, the crimp provides the structural connection that prevents the end cap from shifting or popping off, ensuring the sealant can do its job without stress.
Different Types of Crimpers
While most people call it a gutter end cap crimper, you might hear other pros refer to it as a “button punch” or “button puncher.” This name comes from the small, button-like dimples it creates in the metal. The function is the same: to lock multiple layers of sheet metal together securely. In this case, it’s designed to punch through the outer flange of the end cap, the gutter itself, and the inner flange of the end cap. This three-layer connection creates an incredibly strong and reliable seal that you can count on to hold up against the elements.
What Makes a Great End Cap Crimper?
When you’re on a job, the last thing you need is a tool that quits on you. Not all end cap crimpers are built the same, and the difference between a cheap one and a professional-grade tool becomes obvious pretty quickly. A great crimper isn’t just about getting the job done; it’s about making your work easier, faster, and more precise. Investing in a quality tool means fewer callbacks for leaks, less hand fatigue at the end of the day, and a reliable partner in your toolbox for years to come. When you’re shopping for new gutter tools, there are a few key features that separate the best from the rest. Let’s break down what you should be looking for to ensure you get a tool that works as hard as you do.
Durable Materials and Construction
Your tools take a beating, from being tossed in the truck to facing the elements on a roof. That’s why a top-tier end cap crimper starts with high-quality materials. Look for tools forged from hardened steel that can handle repeated pressure without bending or breaking. Beyond the base metal, protective coatings are essential. Finishes like nickel plating or black oxide aren’t just for looks; they provide a crucial barrier against rust and corrosion, extending the life of your tool significantly. This robust construction ensures your crimper will deliver consistent, clean results job after job, season after season.
Comfortable and Effective Grip Design
If you’re crimping end caps all day, a bad handle design can lead to serious hand fatigue. A great crimper is designed with ergonomics in mind. Look for handles with a comfortable, non-slip grip that gives you full control, even when you’re wearing gloves or working in wet conditions. Many professional models also feature a spring-assisted opening, which reduces the effort needed to operate the tool repeatedly. This thoughtful design maximizes your leverage, allowing you to apply the necessary force with minimal strain, which makes a huge difference over the course of a long workday.
The Importance of Adjustability
Gutter jobs aren’t one-size-fits-all, and your crimper shouldn’t be either. Adjustability is a game-changing feature that allows you to adapt to different materials and project requirements. A high-quality crimper will let you change the depth of the crimp, typically from around 1/4 inch to 5/8 inch. This versatility means you can create the perfect, secure lock on various gutter profiles and thicknesses without needing to carry multiple tools. An adjustable crimper ensures you can achieve a tight, professional seal every time, no matter what the job throws at you.
Built to Last: Key Durability Factors
A tool’s lifespan is determined by more than just its materials; it’s about smart design. Look for crimpers with a compound leverage system. This mechanism multiplies the force you apply, making it easier to create a strong crimp while putting less stress on the tool’s joints and pivots. This design not only makes your job easier but also contributes to the tool’s overall durability. Another indicator of a long-lasting tool is the manufacturer’s confidence. A solid warranty shows that the company stands behind its product, giving you peace of mind that your investment is protected.
Top Gutter End Cap Crimper Brands
When you’re looking for a tool that will last, turning to a trusted brand is always a smart move. In the world of gutter tools, several names consistently stand out for their quality, durability, and thoughtful design. While many crimpers perform the same basic function, the differences in material, construction, and ergonomics can have a big impact on your daily workflow and the final quality of your installation.
Choosing the right brand often comes down to your specific needs and preferences. Some professionals stick with the same brand for all their tools, while others pick and choose based on which company makes the best version of a specific item. Whether you prioritize an adjustable design, a comfortable grip, or sheer durability, there’s a reputable brand that makes a crimper for you. Let’s walk through some of the top names in the industry so you can find the perfect tool for your kit.
Stortz Tools
Stortz has a long-standing reputation for providing high-quality, professional-grade tools, and their crimper is no exception. The Midwest Gutter End Cap Crimper offered by Stortz is specifically designed for efficiency and a secure fit. It creates a distinctive double inside crimp and a louvre-style outside crimp, which ensures the end cap is fastened tightly and cleanly. For professionals who need a reliable tool that delivers a consistent, watertight seal every time, this crimper is a top-tier choice. Its solid construction means it’s built to handle the demands of daily use on the job site without wearing down.
Malco Products
Malco is another heavyweight in the world of specialty tools, and their gutter end cap crimper is known for its versatility. The key feature of the Malco Gutter End Cap Crimper is its adjustability, which allows it to function as a snap lock punch. This makes it useful not just for locking end caps on aluminum gutters but also for working with heating ductwork. This adaptability makes it a valuable tool for contractors who handle a variety of tasks. Professionals who choose Malco often appreciate the brand’s commitment to creating multi-functional tools that are both durable and easy to use.
Classic Gutter Systems
Classic Gutter Systems is known for its comprehensive approach to guttering, offering everything from the gutters themselves to the specialized tools needed for installation. While they may not be as widely known for individual hand tools as other brands, their crimpers are designed to work seamlessly with their own systems. Professionals who install Classic Gutter Systems often rely on their tools to ensure a perfect fit and finish. The brand’s focus is on creating a complete, high-performing system, and their tools are an integral part of achieving that professional result.
K-Style Tools
As the name suggests, K-Style Tools specializes in products designed for the most common type of gutter profile. Their tools are created with the specific needs of gutter installation professionals in mind. A crimper from K-Style is built for efficiency and reliability, helping contractors complete jobs quickly without sacrificing quality. The brand focuses on practical, no-frills tools that get the job done right. For specialists who primarily work with K-style gutters, having tools from a brand that lives and breathes that specific design can be a major advantage.
Berger Tools
Berger has been a trusted name in the roofing and sheet metal trades for generations. They are recognized for producing high-quality metalworking tools that are both precise and incredibly durable. A Berger gutter end cap crimper is built to last, making it a popular choice among seasoned contractors who are willing to invest in tools that won’t need frequent replacement. The brand’s reputation is founded on precision engineering, so you can expect a clean, effective crimp that contributes to a leak-proof seal and a professional appearance.
Midwest Snips
While Midwest Snips is famous for its extensive line of metal cutting tools, their expertise in metalworking extends to other essential tools like crimpers. Their gutter crimpers are known for their excellent ergonomic design, which helps reduce hand fatigue during long days on the job. Midwest tools are effective at creating the secure connections needed for a durable gutter system. For professionals who already trust Midwest for their snips and cutters, adding their crimper to the toolbox is a natural choice, ensuring a consistent level of quality and comfort.
Van Mark Tools
Van Mark is a highly reputable brand in the metalworking industry, best known for its high-end brakes and other forming tools. Their commitment to quality is also evident in their hand tools, including their gutter end cap crimpers. A Van Mark crimper is designed for professional use, ensuring that end caps can be fastened securely and with minimal effort. Contractors who use Van Mark equipment often do so because they trust the brand’s engineering and durability. Their hand tools are built to the same high standards, making them a reliable option for any serious gutter installer.
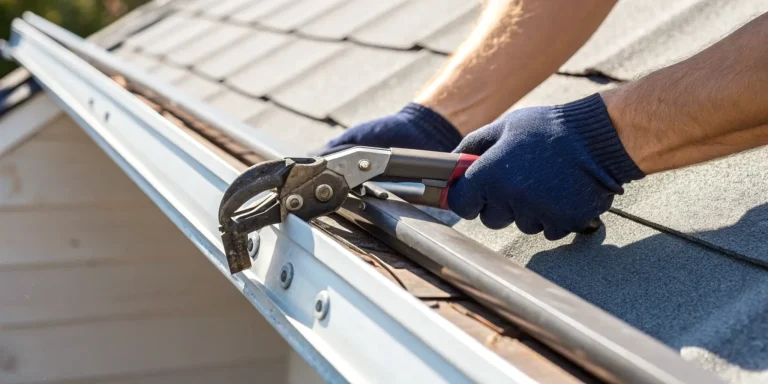
How to Use a Gutter End Cap Crimper
Using a gutter end cap crimper is a fundamental skill for any roofing or gutter professional. It’s the best way to create a strong, mechanical bond that ensures end caps stay put for years. While the process is straightforward, paying close attention to the details is what separates a quick fix from a quality, long-lasting installation. Following these steps will help you achieve a secure, watertight seal every time, preventing leaks and costly callbacks down the road.
Prepping the Gutter and End Cap
Proper preparation is the key to a leak-proof seal. Before you even think about crimping, start by making sure your gutter has a clean, straight cut. Test the end cap by doing a “dry fit”—slide it onto the gutter to ensure it sits flush and snug. If the fit is off, you’re setting yourself up for problems. Once you’re happy with the fit, clean both surfaces thoroughly. Use a rag to wipe down the inside of the gutter and the end cap to remove any manufacturing oils, dirt, or debris. This simple step ensures your sealant will create a strong, durable bond with the metal.
A Step-by-Step Guide to Crimping
With your surfaces prepped, you’re ready to go. First, apply a continuous bead of high-quality gutter sealant along the inside edge of the gutter where the end cap will sit. Don’t be shy, but avoid excessive overflow. Firmly press the end cap into place over the sealant. Now, grab your crimper. Position its jaws over the seam where the end cap overlaps the gutter wall. Squeeze the handles firmly to create a clean indentation. Repeat this process, spacing your crimps about every two inches along the top, bottom, and side of the end cap to secure it tightly against the gutter.
Important Safety Precautions
Your safety on the job is always the top priority. Since gutter work almost always involves heights, start by ensuring your ladder is on stable, level ground. Always maintain three points of contact when climbing or repositioning. It’s also crucial to wear the right personal protective equipment (PPE). Heavy-duty work gloves are a must to protect your hands from the sharp edges of sheet metal. Taking a few moments to follow proper ladder safety guidelines and protect yourself can prevent serious injuries and keep you working efficiently. Never rush through a setup when you’re working off the ground.
Tips for a Perfect, Watertight Seal
The crimps provide the mechanical strength, but the sealant is what makes the joint waterproof. After crimping the end cap securely, it’s a good practice to apply a second, smaller bead of sealant on the inside seam. Use your finger or a small tool to smooth this bead into the corner, creating a seamless, waterproof barrier. On the outside, wipe away any sealant that may have squeezed out for a clean, professional finish. Finally, give the sealant ample time to cure based on the manufacturer’s instructions before you water-test your work.
Common Mistakes to Avoid
Even experienced pros can make mistakes, but knowing what to look for helps. One of the biggest errors is using the wrong tool—regular pliers just won’t create the right kind of crimp and can damage the gutter. Always use one of the dedicated gutter tools designed for the job. Another common issue is under-crimping. If you don’t apply enough pressure, the mechanical bond will be weak and can fail over time. Conversely, over-crimping can deform the metal. Aim for a firm, consistent pressure that creates a distinct dimple without warping the gutter or end cap.
Crimper Alternatives: Other Ways to Secure End Caps
While a dedicated gutter end cap crimper is designed for the job, every pro knows that sometimes you have to work with the tools you have on hand. If you find yourself without a crimper, don’t worry. There are several reliable methods to secure an end cap and still achieve a professional, leak-proof finish. The key is understanding which alternative works best for your situation and ensuring you create a solid hold that allows the sealant to cure properly.
Using Pliers for a Manual Crimp
In a pinch, a good pair of pliers can mimic the action of a crimper. You can use a vise grip or standard pliers to carefully create indentations along the edge of the gutter where it meets the end cap. This manual method requires a steady hand and a bit more muscle, but it effectively creates the friction fit needed to hold the cap in place. The goal is to make small, evenly spaced crimps that secure the cap without warping the gutter. This technique is a testament to a roofer’s resourcefulness and skill with fundamental metal bending tools.
When to Use Rivets
For a connection that offers maximum strength and durability, rivets are an excellent choice. Riveting end caps creates a much stronger mechanical bond than crimping alone, making it ideal for regions with heavy snowfall or for commercial projects where longevity is paramount. If you want a very secure connection for end caps, using rivets is highly recommended. While it adds an extra step to the process, the peace of mind that comes with a rock-solid, permanent fixture is often worth the effort. Just remember to seal over the rivets on the inside of the gutter to prevent any potential leaks.
Securing with Zip Screws
Zip screws, or self-tapping screws, are another fast and effective way to attach an end cap. They quickly bite into the metal, creating a secure hold with minimal effort. While you could use pop rivets or a zip screw, it’s important to note that this method may not provide the same clean, factory-finished look as a proper crimp. If you choose this route, use short screws that won’t snag debris inside the gutter and be sure to apply a quality sealant over the screw heads on the interior to maintain a watertight seal.
Using Adhesives and Sealants
Regardless of the mechanical method you use—crimping, riveting, or screwing—a high-quality sealant is non-negotiable. The primary function of the mechanical fastener is to hold the end cap firmly in place while the sealant cures and creates the final waterproof barrier. Don’t be shy with the sealant; apply a generous bead inside the end cap’s channel before fitting it onto the gutter. Once it’s attached, add another bead along the interior joint to ensure a completely watertight finish, similar to the process used in metal roof soldering to create impermeable seams.
How to Choose an Alternative Method
So, how do you decide which method is right for the job? It comes down to your priorities. Remember, the main goal is to hold the end cap in place until the sealant dries. If you’re in a bind and just need a quick, effective solution, pliers will do the trick. If the project demands superior strength and you’re not concerned about the aesthetics of visible fasteners, rivets are your best bet. Zip screws offer a balance of speed and security. Ultimately, your choice should be based on the specific project requirements, the tools available, and the finished look you want to achieve.
Maintain Your Tools, Prevent Leaks
Your tools are an extension of your skill, and a well-maintained gutter end cap crimper is your best defense against leaks. Taking care of your equipment isn’t just about making it last longer; it’s about ensuring every crimp is as solid and secure as the first. A clean, properly aligned tool provides a consistent, watertight seal that protects your work and your reputation. Think of it this way: the few minutes you spend on maintenance after a job can save you hours of headaches and costly callbacks later. By following a few simple practices for cleaning, inspection, and use, you can keep your crimper in prime condition and guarantee a professional finish on every gutter system.
Proper Cleaning and Storage
The secret to a long-lasting tool is simple: keep it clean and dry. After each use, take a moment to wipe down your crimper, removing any dirt, debris, or excess sealant from the jaws and handles. This prevents buildup that can interfere with the tool’s mechanism and lead to rust. For storage, find a dry spot in your truck or workshop, away from moisture. Storing your crimper in a dedicated toolbox or bag protects it from getting banged around, which can cause misalignment. Regular maintenance is key to keeping your gutter tools in top shape, ensuring they perform effectively for years to come.
Performing Regular Inspections
Before you even start a job, give your crimper a quick once-over. Regular inspections help you catch small issues before they turn into big problems on the roof. Check the jaws for any signs of wear, chips, or damage that could affect the quality of your crimp. Make sure the handles aren’t loose and that the pivot point moves smoothly without sticking. Addressing minor issues early, like tightening a loose bolt, is a key step in maintaining an efficient tool. This habit ensures your crimper is always ready to perform reliably, preventing failed seals and potential water damage for your client.
How to Check and Correct Alignment
A perfect crimp depends on perfect alignment. If the jaws of your crimper don’t meet precisely, you’ll get an uneven, weak seal that’s prone to leaking. To check the alignment, simply close the handles and look closely at how the jaws come together. They should meet evenly across their entire surface. Misalignment is often caused by dropping the tool or using it to pry or bend materials it wasn’t designed for. While high-quality metal bending tools are built to hold their shape, it’s always a good idea to check. If you notice a problem, it’s often better to replace the tool than to risk a faulty installation.
Applying the Right Amount of Pressure
Using a gutter end cap crimper is all about finesse, not brute force. The tool is designed with a mechanical advantage that multiplies your hand strength, so a firm, steady squeeze is all you need. Applying too much pressure can dent or even puncture the gutter and end cap, compromising the seal and creating a weak spot. Too little pressure, and the crimp won’t be tight enough to hold. If you’re new to a specific tool, practice on a scrap piece of gutter first to get a feel for the right amount of pressure needed to create a secure, clean-looking crimp without damaging the material.
Applying Sealant Correctly
While the crimper creates the mechanical bond, the sealant is what makes it truly waterproof. The key is to apply the sealant before you attach the end cap. Run a continuous bead of high-quality gutter sealant along the inside edge of the gutter where the end cap will sit. Once you place the end cap over the sealant and crimp it into place, the pressure will spread the sealant to create a durable, watertight barrier. Don’t skimp on this step or use the wrong type of caulk. Using a proper gutter sealant is just as important as using the right metal cutting tools for a clean fit.
How to Test Your Seal
Your work isn’t done until you’ve tested the seal. Once you’ve crimped the end cap, perform a quick “end cap test” by giving it a firm tug. It shouldn’t move, wiggle, or slide at all. A solid, unmoving cap is a good sign that your crimp is secure. For complete peace of mind, you can also do a water test before installing the gutter section. Simply plug the downspout opening, stand the gutter up on its end cap, and pour in a little water. Let it sit for a few minutes to see if any drips appear. This simple test takes moments but confirms your seal is perfect, saving you from future leaks.
How to Choose the Right Crimper
Picking the right gutter end cap crimper isn’t just about finding a tool that works—it’s about finding the tool that works for you and the jobs you tackle every day. The right crimper feels like an extension of your hand, creating clean, tight seals efficiently and reliably. A poor-quality or ill-suited tool, on the other hand, can slow you down, damage materials, and lead to frustrating leaks and callbacks.
Think of it as an investment in your craft. A durable, well-designed crimper will not only last for years but will also contribute to the overall quality and professionalism of your work. To make the best choice, you need to consider the frequency of your gutter work, the materials you use, the sizes you handle, and what features truly signal a high-quality tool. Let’s walk through the key factors to help you select a crimper that will become a trusted part of your toolkit.
Pro vs. DIY Tool Needs
First things first: how often are you installing gutters? For a homeowner tackling a one-time weekend project, buying a specialized crimper might not be practical. As one expert notes, “An end cap crimper isn’t worth the cost unless you are doing lots of gutters.” However, for a professional roofer or gutter installer, this tool is essential. Owning a high-quality crimper means you’re always prepared, can work more efficiently, and can deliver a consistently professional finish. It’s a small investment that pays off in speed, reliability, and the quality of your finished work, which is your ultimate business card.
Matching the Tool to the Material
Not all gutters are made of the same stuff, and your crimper needs to be up to the task. Using a tool designed for lightweight aluminum on a heavier gauge steel gutter can damage both the material and the tool itself. Look for a crimper that is compatible with the materials you work with most often, whether it’s aluminum, steel, or copper. Some tools, like the Malco SL2R, are known for being “a versatile and durable tool for both gutter installation and sheet metal work.” Having a range of reliable gutter tools ensures you can create a perfect seal every time, no matter the job’s specifications.
Finding the Right Size
Gutters come in various sizes, and your crimper needs to match. Using a tool that’s too large or too small for the end cap will result in an uneven, weak crimp that’s prone to leaks. Many professional-grade crimpers are designed to be versatile. For instance, some models are specifically made for “5-inch, 6-inch, and 8-inch end caps,” covering the most common residential and commercial sizes. Before you buy, double-check the tool’s specifications to ensure it aligns with the gutter systems you typically install. An adjustable or multi-size crimper can be a great, flexible addition to your toolkit.
How to Set Your Budget
When it comes to tools, you often get what you pay for. While you can find a basic end cap crimper for as little as $18.00, professionals should view this purchase as an investment in their business. A cheaper tool might save you money upfront, but it could fail you mid-job, costing you time and credibility. A professional-grade crimper made from superior materials will perform more reliably and withstand the daily demands of the job site. Set a budget that prioritizes durability and performance, ensuring you get a tool that will pay for itself through years of dependable use.
Signs of a High-Quality Tool
You can often spot a quality tool just by looking at it. Look for crimpers where the “parts that cut and the handles [are] made from tough, hardened metal.” This ensures the tool won’t bend or lose its edge under pressure. Another key indicator is the finish. Special coatings like “nickel plate and black oxide” aren’t just for looks; they provide crucial resistance to rust and corrosion, extending the tool’s lifespan. Also, consider the ergonomics. Comfortable, non-slip grips reduce hand fatigue, making a real difference during long days on the job. Investing in well-made metal cutting tools means you’re investing in reliability.
Related Articles
Frequently Asked Questions
Do I really need a dedicated crimper, or can I just use pliers? While you can certainly use pliers to create a manual crimp in a pinch, a dedicated gutter end cap crimper is designed to give you a much cleaner and more uniform result. The jaws on a proper crimper create a specific indentation that provides a secure, even grip without damaging or warping the gutter. Using one ensures a professional finish and a stronger mechanical bond, which is essential for a long-lasting installation.
What’s more important for a leak-proof seal: the crimp or the sealant? Think of them as a team that can’t function without each other. The crimp provides the mechanical strength, physically locking the end cap onto the gutter so it can’t shift or pop off under the weight of water and debris. The sealant creates the actual waterproof barrier. Without a solid crimp, the sealant is put under stress and can fail. Without sealant, even the tightest crimp will eventually let water through.
How many crimps are enough for a secure end cap? A good rule of thumb is to space your crimps about every two inches along the entire seam where the end cap overlaps the gutter. You should apply them to the top, bottom, and side of the end cap. The goal isn’t a specific number but rather to create consistent, even pressure all the way around, ensuring the end cap is held tightly against the gutter wall from every angle.
Can I use the same crimper for different gutter materials like steel and aluminum? Most professional-grade crimpers are built from hardened steel and can handle common materials like aluminum and steel. However, it’s always best to check the manufacturer’s specifications. A light-duty tool designed for aluminum might struggle with heavier gauge steel, potentially damaging the tool or the gutter. Investing in a robust, high-quality crimper ensures you have the versatility to work on different jobs without issue.
My crimps look uneven. Is my tool broken or am I doing something wrong? This could be one of two things. First, check your technique—uneven crimps can happen if you’re not applying firm, consistent pressure with each squeeze. Practice on a scrap piece to get a feel for it. If your technique is solid, inspect your tool. A crimper that has been dropped or used improperly can have misaligned jaws. Close the tool and look closely to see if the jaws meet perfectly. If they don’t, it’s time for a replacement to avoid faulty seals.