
When your reputation is on the line with every job, the quality of your tools is paramount. A cheap, poorly made tool can fail at a critical moment, leading to delays and subpar results. This is especially true for a tool you use constantly, like a downspout crimper. Investing in a well-built model from a trusted brand means you get hardened steel construction, rust-resistant finishes, and an ergonomic design that can withstand the rigors of the job site. A reliable crimper produces clean, consistent results that reflect your commitment to quality, ensuring your gutter installations are both functional and professional for years to come.
Key Takeaways
- Master your technique for a perfect seal: A clean, leak-proof connection depends on consistent depth, firm pressure, and keeping the tool perfectly aligned as you work around the downspout.
- Choose features that improve your work: Look for a crimper with a 5-blade design for a smoother finish, ergonomic handles to reduce fatigue during repetitive tasks, and hardened steel construction to ensure it lasts.
- Maintain your tools to guarantee quality work: Simple habits like wiping down your crimper after use, storing it properly, and always wearing gloves and safety glasses will protect your investment, ensure reliable performance, and keep you safe on the job.
What is a Downspout Crimper and What Does It Do?
If you work with gutters, a downspout crimper is one of those essential tools you’ll reach for again and again. Think of it as the key to creating clean, professional, and leak-proof gutter systems. Its main job is to shrink the end of a metal downspout section, allowing it to slide neatly inside another section or fitting. This simple function is critical for building a system that directs water away from a building’s foundation effectively.
Without a proper crimp, you’re left trying to force pieces together, which can damage the material and lead to sloppy, unreliable connections. A good crimper creates a uniform, factory-quality finish that not only looks better but also ensures a tight seal that stands up to the elements. It’s a specialized tool designed for one purpose, and it does it perfectly, saving you time, effort, and the headache of dealing with leaks down the road.
The Main Purpose of a Crimper
At its core, a downspout crimper is designed to make one end of a downspout smaller so it can fit snugly into the next piece. When you join two sections, one end needs to be slightly narrower to slide inside the other. The crimper accomplishes this by creating a series of small, uniform indentations, or “crimps,” around the circumference of the metal. This process creates a secure, male-to-female connection that prevents water from escaping at the seams. A quality tool will produce a “double crimp,” which creates a more defined and watertight seal, ensuring your connections are solid and leak-proof for years to come.
A Look at the Components and Design
A well-made downspout crimper is built for durability and ease of use on the job site. Most professional-grade models are constructed from hardened steel with a nickel-chrome finish to resist rust and wear. The business end of the tool consists of several blades—typically three or five—that form the crimps in the metal. The real magic, however, often lies in the handles. Look for ergonomic designs with non-slip grips that provide comfort and leverage, reducing hand fatigue during repetitive tasks. Many gutter tools also feature a thumb-operated latch, which allows for easy one-handed operation when you’re up on a ladder.
Different Types of Crimpers on the Market
While all downspout crimpers serve the same basic function, you’ll generally find them in 3-blade and 5-blade varieties. A 3-blade crimper is a solid, all-around tool that works well for standard residential downspouts and lighter-gauge metals. It gets the job done efficiently and is a staple in many toolkits. For heavier-gauge materials or for achieving a deeper, more consistent crimp with less effort, a 5-blade model is the way to go. The additional blades distribute the pressure more evenly, creating a smoother, more uniform crimp that’s ideal for commercial jobs or when you need the most secure connection possible.
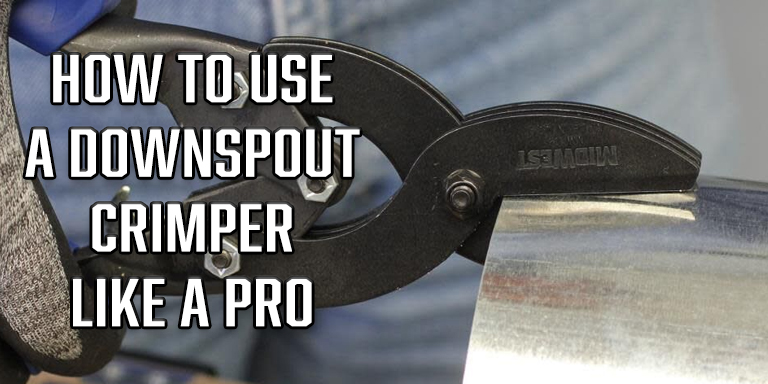
How to Use a Downspout Crimper
A downspout crimper is a straightforward tool, but using it correctly is what separates a clean, professional job from a sloppy, leaky one. The basic idea is to create a series of small, uniform indentations around the end of a metal tube. This reduces the diameter just enough for it to slide snugly into another section of the same size, creating a secure male-to-female connection. It’s all about precision and control. When you get the hang of it, you’ll be able to create tight, reliable joints quickly and efficiently, whether you’re working on a roofline or connecting ductwork.
Your Step-by-Step Guide to Crimping
Getting a perfect crimp is all about technique. Start by opening the handles of your crimper and placing the jaws over the end of the downspout or pipe. Make sure the tool is perpendicular to the material to keep the crimp even. Squeeze the handles firmly to create the first set of indentations, then release. Rotate the downspout slightly, overlap the last crimp by one groove, and squeeze again. Continue this process around the entire circumference of the pipe. Proper alignment is key; it ensures a clean, effective crimp that will fit securely. With a little practice, you’ll find the rhythm and pressure that works best for you and your gutter tools.
What Materials Can You Crimp?
Downspout crimpers are designed to work with a variety of common sheet metals. You can effectively use them on aluminum, copper, and different types of steel, including galvanized and mild steel. Some heavy-duty models can even handle lighter gauges of stainless steel. The tool works by creating controlled deformations in the metal, so it performs best on materials that are malleable enough to be shaped without cracking or breaking. Always check the manufacturer’s specifications for your specific crimper to understand its capabilities and limitations, especially when working with thicker or tougher metals. Using the right tool for the material ensures a clean job and extends the life of your equipment.
Common Jobs That Require a Crimper
The primary function of a downspout crimper is to downsize the end of a pipe so it can fit inside another piece of the same diameter. This simple function makes it an essential tool for a wide range of jobs. It’s most commonly used by roofers and gutter installers to connect sections of downspout, ensuring a smooth flow of water away from the building. You’ll also find crimpers in the toolkits of HVAC technicians for joining sections of round metal ductwork. Other common applications include connecting stove pipes and creating custom fittings in various sheet metal fabrication projects. Any time you need to create a secure, telescoping connection between two pieces of round metal pipe, a crimper is the right tool for the job.
Key Features to Look for in a Crimper
A downspout crimper might seem like a simple tool, but the small details can make a big difference in your workday. Choosing the right one means cleaner results, less hand fatigue, and a tool that will last for years. When you’re ready to add a new crimper to your toolbox, here are the key features to pay attention to. It’s about finding that perfect balance of performance, comfort, and durability that makes your job easier and your work stand out.
Why Blade Design Matters
The business end of the crimper is its blades, and their design is critical for performance. You’ll typically see options with three or five blades. A 5-blade crimper generally creates a longer, more gradual crimp, which is ideal for ensuring a snug, leak-proof connection between downspout sections. A 3-blade design can be effective for tighter spaces or different material thicknesses. The goal is always a watertight seal, and the right blade configuration helps you achieve that factory-quality finish on every single connection you make.
Finding a Comfortable, Ergonomic Handle
You’ll be using this tool all day, so comfort is non-negotiable. Look for crimpers with ergonomic handles designed to reduce strain on your hands and wrists. Features like non-slip grips give you better control, especially when you’re working in wet conditions or wearing gloves. Some of the best designs, like those with Malco’s “RedLine Handles,” are shaped to fit your hand naturally. A thumb-operated latch is another great feature that allows for easy one-handed use, freeing up your other hand to hold the downspout steady.
Matching the Tool Size to the Job
Crimpers are specifically designed to make the end of a downspout section slightly smaller, allowing it to slide neatly into the next piece. It’s essential to choose a tool that’s properly sized for the gutter systems you work with most often. Using a crimper that’s too large or too small for the downspout will result in a poor fit, leading to potential leaks and a less professional look. Always check that the tool’s capacity and design match the materials and dimensions of your project for a secure, seamless connection.
How to Spot a Durable, Well-Built Tool
A tool that breaks down mid-job is a major headache. To avoid this, inspect the build quality before you buy. The most durable crimpers are made from hardened, all-steel materials that can withstand the rigors of daily use on a job site. A nickel-chrome finish is another sign of a quality tool, as it provides excellent resistance to rust and corrosion. Investing a little more in a well-built tool from a reputable brand means you’ll have a reliable partner in your toolbox for years to come.
Getting the Best Value for Your Money
Getting the best value isn’t just about finding the lowest price—it’s about getting a quality tool that performs well without breaking the bank. If you’re outfitting a crew or just stocking up, check if your supplier offers discounts for larger orders. Buying your essential sheet metal tools in a single purchase can sometimes lead to savings. Ultimately, the best value comes from a tool that is durable, effective, and comfortable to use, saving you time and replacement costs down the line.
Top Brands for Downspout Crimpers
When you’re investing in a tool you’ll use day in and day out, the brand name carries a lot of weight. A reputable brand often means better materials, smarter design, and a tool that won’t quit on you mid-job. While there are dozens of options out there, a few names consistently stand out in the world of downspout crimpers. Let’s walk through some of the top brands you’ll encounter, so you can find the right fit for your work.
Stortz Tools
Stortz has a long-standing reputation for providing professional-grade roofing tools, and their selection of crimpers is no exception. They offer the Midwest 5 Blade Duct Crimper, a tool engineered to create factory-perfect corrugations every time. This precision is key for forming tight-fitting, secure joints on ducts, stovepipes, and downspouts. For professionals who can’t afford leaks or callbacks, the reliability of a tool like this is a huge asset. It’s built for consistent performance on the job site, making it a solid choice for anyone who needs clean, dependable crimps without any fuss. When you buy from Stortz, you know you’re getting a tool vetted for the demands of professional work.
Malco Products
Malco is a name you’ll hear often from seasoned pros, and for good reason. Their tools are known for being tough and effective. The Malco Downspout Crimper SC2 is a popular choice, especially for its durability. It’s made with carbon steel blades and features nickel plating to resist wear and tear on the job. With a throat depth of 1-1/8 inches, it’s well-suited for most standard downspout work and other light-duty tasks. Users often praise its solid performance and comfortable grip, which makes repetitive crimping tasks a little easier on the hands. If you’re looking for a reliable, no-nonsense crimper that gets the job done, Malco is definitely a brand to consider.
RIDGID
While you might know RIDGID best for their iconic pipe wrenches, their commitment to quality extends across their entire line of tools. Professionals in plumbing and HVAC have trusted this brand for decades because their tools are built to withstand demanding work environments. RIDGID crimpers are designed with durability and efficiency in mind, making them a reliable option for any professional’s toolkit. They focus on creating tools that deliver consistent performance job after job. If you already have RIDGID tools in your truck, you know the level of quality to expect. Their reputation is built on creating heavy-duty hand tools that simply don’t quit, which is exactly what you need for a task like crimping.
Milwaukee Tool
Milwaukee Tool has a massive following among professionals, and it’s easy to see why. They are constantly pushing the envelope with innovative, user-friendly designs that make tough jobs easier. While they are famous for their power tools, their hand tools are crafted with the same attention to detail and durability. Milwaukee’s crimpers are built for the professional who needs a robust, reliable tool that feels good in the hand and performs consistently. They understand the demands of the job site and design their hand tools to match. For anyone invested in the Milwaukee ecosystem, adding one of their crimpers to your collection is a smart move that you know will live up to the brand’s high standards.
DeWalt
DeWalt is another powerhouse in the tool industry, with a reputation built on creating tough, reliable products for the most demanding jobs. When you see that yellow and black, you know you’re getting a tool designed for heavy-duty use. Their crimpers are no different. They are engineered to withstand the daily rigors of a professional work site, from being tossed in a truck to being used in all kinds of weather. DeWalt focuses on creating durable hand tools that provide the leverage and strength needed for clean, efficient crimps. For contractors who rely on their tools to make a living, the dependability of a brand like DeWalt is a major selling point. It’s a name you can trust to perform.
SLNIHAMS
Though perhaps a newer name to some, SLNIHAMS has made a mark with versatile and accessible tools. Their 5-Blade Hand Crimper is a great example, designed to create perfect connections in everything from ductwork to downspouts and gutters. The five-blade design helps ensure a uniform crimp, which is essential for a snug and secure fit. This tool is often noted for its value, making it a practical option for both professionals looking for a reliable backup and even dedicated DIYers tackling home projects. Its straightforward design and effective performance make it a valuable addition to any toolbox, offering a good balance of function and affordability.
Midwest Snips
Midwest Snips has carved out a stellar reputation for producing some of the best hand tools on the market, especially when it comes to cutting and forming sheet metal. Professionals favor this brand for its commitment to precision and quality. Their crimpers are designed for ease of use without sacrificing performance, allowing you to make clean, consistent crimps with less effort. The reliability of Midwest tools means you can trust them to perform correctly every time, which is critical when you’re on a roof or a ladder. Because they specialize in tools for sheet metal work, they understand exactly what professionals need: durability, accuracy, and comfort. It’s no surprise that many multi-brand retailers, including Stortz, choose to carry their products.
Pro Tips for a Perfect Crimp Every Time
Getting a clean, secure crimp isn’t just about having a good tool—it’s about technique. The small details are what separate a professional, leak-proof job from one that needs a callback. Mastering how you position the tool, apply pressure, and account for your materials will make your work faster, safer, and more durable. These tips will help you refine your process and ensure every connection you make is solid.
Position Your Tool Correctly
Proper positioning is the foundation of a good crimp. A common mistake is setting downspout elbows at poor angles, which creates inefficiencies and leads to leaks down the road. To avoid this, start by inserting the crimper jaws about one to one-and-a-half inches into the end of the downspout. This depth gives you enough material to create a snug, secure fit inside the next section without making it too difficult to connect. Ensure the tool is perpendicular to the edge of the downspout to create an even, uniform crimp all the way around.
Apply the Right Amount of Pressure
Finding the sweet spot with pressure is key. Squeezing too hard can tear or weaken the metal, while not squeezing enough will result in a loose connection that can easily pull apart. The goal is to apply firm, consistent pressure with each squeeze. You’ll feel the tool’s blades bite into the metal and form the crimp. A quality tool will provide good feedback, making it easier to judge the right amount of force. With practice, you’ll develop a feel for it, creating reliable crimps that stand the test of time without damaging the material or over-stressing your tool.
Keep Your Crimp Straight and Aligned
A straight, well-aligned crimp ensures the downspout sections slide together smoothly and form a tight seal. If your crimps are crooked, you’ll struggle to connect the pieces, and you might even damage the ends in the process. To keep things straight, maintain a steady hand and a firm grip as you work your way around the downspout. It helps to keep your eye on the alignment of the tool with the edge of the metal. Wearing proper safety glasses also allows you to focus on your work without worrying about metal shards, helping you maintain that perfect alignment.
Select the Best Material for the Project
Your crimping technique may need to change slightly depending on the material you’re working with. High-quality gutter tools can handle a range of materials, including aluminum, galvanized steel, and copper. Softer metals like aluminum require less pressure to crimp effectively, while harder materials like 24-gauge steel or stainless steel demand more force and a heavy-duty tool. Always make sure your crimper is rated for the material you’re using. Mismatching the tool and the material can lead to a poor-quality crimp and can damage your tool’s blades over time.
Account for Weather Conditions
As a roofer, you know that weather plays a huge role in any job. When you’re crimping downspouts, cold temperatures can make metal more brittle and prone to cracking under pressure. On the other hand, rain and humidity can make your tools and the downspouts slippery and harder to handle safely. Always be mindful of the conditions. On cold days, you might need to apply pressure more slowly and deliberately. When it’s wet, ensure you have a secure footing on your ladder and wear gloves with a good grip to maintain control over your tools and materials.
How to Avoid Common Crimping Mistakes
Even the most seasoned pros can slip up now and then. When it comes to crimping, a few common mistakes can turn a straightforward job into a frustrating repair. The good news is that these errors are easy to avoid once you know what to look for. Paying attention to placement, pressure, and your tools will ensure every connection is secure and professional. Let’s walk through the most frequent missteps and how to steer clear of them.
Fixing Incorrect Placement
Measurements are truly half the battle in any downspout installation. If your placement is off, even by a little, it can compromise the entire system. An incorrectly placed crimp can lead to poor water flow, leaks, and a connection that just won’t hold. Before you even pick up your crimper, double-check your measurements and mark exactly where you need to crimp. Taking an extra minute to confirm your marks will save you from having to scrap a piece of material and start over. It’s a simple step that prevents a major headache.
Using Too Much or Too Little Pressure
Finding the sweet spot with pressure is key to a perfect crimp. If you squeeze too hard, you risk crushing or cracking the downspout, especially with lighter gauge metals. On the other hand, too little pressure results in a weak, loose connection that can easily pull apart. The goal is a firm, indented crimp that allows the pieces to slide together snugly without deforming the metal. Practice on a scrap piece first to get a feel for how much force your specific gutter tools require for the material you’re using.
Correcting Alignment Errors
A straight, clean connection looks professional and functions correctly. Misaligned elbows or downspout sections are a primary cause of leaks and drainage problems. If the two pieces aren’t perfectly aligned when you crimp, the connection will be crooked and won’t seal properly. Always take a moment to ensure all components are straight and fit together flush before you apply pressure with the crimper. A visual check from a few different angles can help you spot any alignment issues before they become a permanent problem.
Mismatching Your Tool and Material
Not all crimpers are built for every job. Using the wrong tool for the material is a recipe for a failed crimp and potential damage. For example, a 3-blade crimper is great for creating a tight, factory-style crimp on round downspouts, while a 5-blade crimper is better suited for creating longer, shallower crimps on larger rectangular downspouts. Make sure your tool is designed for the gauge and type of metal you’re working with. Using the right Stortz tool for the job ensures an effective, lasting connection every time.
The Cost of Neglecting Tool Maintenance
Your tools are your livelihood, and a neglected crimper is an unreliable one. Dirt, rust, or debris in the jaws can prevent a clean crimp and even damage the downspout material. Worn-out or dull blades won’t create the sharp, defined indentations needed for a secure fit. Get into the habit of wiping down your crimper after each use and inspecting it for signs of wear or damage. Proper maintenance not only extends the life of your tool but also guarantees the quality and integrity of your work.
Your Guide to Crimper Safety and Maintenance
A quality downspout crimper is an investment that pays you back with clean, professional results. But like any tool in your truck, it needs a little attention to perform its best and last for years. Taking care of your crimper isn’t just about protecting the tool; it’s about ensuring your safety and the quality of your work. A well-maintained tool functions predictably and efficiently, saving you time and frustration on the job site. By building a few simple habits for safety, care, and storage, you can keep your crimper in top shape and ready for any project.
Essential Safety Gear
Working with sheet metal always comes with risks, and using a crimper is no exception. The edges of a downspout can be incredibly sharp, and small metal shavings can easily become projectiles. Before you start any job, make sure you’re wearing the right personal protective equipment (PPE). A sturdy pair of work gloves is non-negotiable; they protect your hands from cuts and give you a better grip on the tool and material. Equally important are safety glasses or goggles. They shield your eyes from any debris that might fly off during the crimping process, preventing serious injury.
How to Care for Your Tool
Proper tool care is simple and goes a long way in extending the life of your crimper. After each use, take a moment to wipe the tool down with a dry cloth. This removes moisture, dirt, and metal shavings that can lead to rust and corrosion over time. Pay special attention to the jaws and pivot points, as debris can build up and affect the tool’s smooth operation. A quick inspection of the handles and fasteners will also ensure everything is tight and secure. This small step helps maintain the performance of your essential gutter tools and keeps them ready for the next job.
The Right Way to Store Your Crimper
How you store your crimper is just as important as how you clean it. Tossing it into a crowded toolbox with heavier equipment is a recipe for damage. The jaws can get knocked out of alignment, and the handles can get bent or cracked. The best practice is to store your crimper in a dry, designated spot. A dedicated drawer in your toolbox, a slot in a tool bag, or a hook on a pegboard in your workshop are all great options. The goal is to protect it from moisture, which causes rust, and from physical impact that could compromise its structure and performance.
A Simple Maintenance Schedule
You don’t need a complicated schedule to keep your crimper in good working order. Just get into the habit of giving it a quick look before you start a project. Check that the jaws align perfectly and that the handles open and close smoothly. Once a month, or after a particularly demanding job, take a closer look. Apply a drop of lubricating oil to the pivot point to ensure a fluid motion. If your crimper has any adjustable parts, confirm they are still properly calibrated. This proactive approach helps you catch small issues before they become bigger problems that could delay your work.
Know When It’s Time for a Replacement
Even the most durable tool won’t last forever. Using a worn-out crimper not only produces sloppy, unprofessional results but can also be a safety hazard. It’s time for a replacement if you notice the jaws are misaligned and can’t be corrected, or if you see visible cracks in the metal. Other signs include blades that are dull and no longer create clean, defined crimps, or a mechanism that sticks or requires excessive force to operate. When your tool starts fighting you, it’s a clear signal that it’s time to invest in a new one to maintain your work quality and efficiency.
Related Articles
Frequently Asked Questions
What’s the real difference between a 3-blade and a 5-blade crimper? Think of it this way: a 5-blade crimper creates a longer, more gradual crimp, which is perfect for getting a really snug, watertight seal on standard downspouts. A 3-blade model is a great all-arounder, but the 5-blade often makes the connection process a bit smoother, especially with heavier gauge metals. For most residential gutter work, either will do the job, but many pros prefer the 5-blade for that superior fit and finish.
Can I use my downspout crimper on stainless steel? Most standard downspout crimpers are designed for common materials like aluminum, copper, and galvanized steel. While some heavy-duty models can handle lighter gauges of stainless steel, you should always check your tool’s specifications first. Trying to crimp metal that’s too thick or hard for your tool can result in a poor connection and, worse, can permanently damage the blades.
My crimps are coming out uneven. What am I doing wrong? If your crimps are looking crooked, the issue is usually about alignment and pressure. Make sure you’re holding the tool perfectly perpendicular to the edge of the downspout, not at an angle. Also, focus on applying firm, steady pressure with each squeeze. A common mistake is rushing and not overlapping your crimps evenly as you work your way around the pipe. Slow down a bit and focus on a consistent technique.
What’s the best way to keep my crimper from rusting? Keeping your crimper in top shape is simple. The most important habit is to wipe it down with a dry cloth after every use to remove moisture and metal shavings that cause rust. Every so often, add a drop of lubricating oil to the pivot point to keep the action smooth. Storing it in a dry place where it won’t get banged around by heavier tools will also prevent damage and corrosion.
Is a downspout crimper only useful for gutters? While its main job is connecting gutter downspouts, a crimper is surprisingly versatile. It’s an essential tool for HVAC technicians who need to join sections of round metal ductwork. You can also use it for connecting stove pipes or in any sheet metal project where you need to create a clean, telescoping connection between two pieces of round pipe.