
Callbacks are a roofer’s worst nightmare. They cost time, money, and can tarnish a hard-earned reputation. Many of these costly issues can be traced back to one small, often overlooked component: the roofing clip. Using a clip that’s incompatible with the panel material, not rated for the local wind load, or improperly installed can lead to catastrophic failure and a voided manufacturer’s warranty. This guide is your defense against those problems. We’ll break down everything you need to know about roofing clips, from material science and thermal dynamics to local building codes, so you can make the right choice every time and protect your bottom line.
Key Takeaways
- Choose the right clip for the specific job: Your selection must match the panel material to prevent corrosion, handle the local climate’s wind and snow loads, and follow the manufacturer’s specs to protect the warranty.
- Proper installation is non-negotiable: Correctly spacing and fastening clips according to the manufacturer’s guide is essential for the roof system to manage thermal movement and resist wind uplift as designed.
- Proactive maintenance protects your work: Regular inspections to find and replace corroded, loose, or damaged clips will prevent small issues from turning into major, system-wide failures down the road.
What Are Roofing Clips and Why Do They Matter?
They might be the smallest component in your roofing system, but roofing clips do some of the heaviest lifting. These small, often hidden pieces of metal are the critical link between the roof panels and the structure of the building. Without the right clips, installed correctly, even the highest-quality metal roof can fail. They’re responsible for securing the roof against wind uplift, managing the natural expansion and contraction of the metal, and ultimately ensuring the entire system is weathertight and long-lasting. Understanding how they work and which ones to use is a fundamental skill for any professional roofer.
The Role of a Roofing Clip
At its core, a roofing clip is a simple but essential fastener. It’s a hidden part that fastens a roof panel to the base underneath using screws. But its job is more complex than just holding things down. For standing seam metal roofs, clips are engineered to allow for thermal movement. As the temperature changes, metal panels expand and contract. Clips give the panels room to slide back and forth without putting stress on the fasteners, which prevents buckling, oil canning, and potential leaks down the road. They anchor the system while giving it the flexibility it needs to breathe.
Common Materials and Their Lifespan
Clips come in several materials, and choosing the right one is crucial for the roof’s longevity. The most common options are galvalume and galvanized steel, but you’ll also find stainless steel, copper, and aluminum. The key is to match the clip material to your roofing panels to prevent galvanic corrosion—a chemical reaction that occurs when two dissimilar metals touch. For example, you should always use stainless steel or copper clips with a copper roof. For coastal areas with salt in the air, durable stainless steel clips are the best defense against corrosion and ensure the fastening system lasts as long as the roof itself.
Where You’ll Use Them on Commercial Roofs
On commercial projects, you’ll find roofing clips used to attach long runs of standing seam panels to the roof deck or the building’s structural purlins. They are installed at precise, engineered intervals along the length of each panel’s seam. This spacing isn’t random; it’s calculated based on factors like the building’s location, expected wind uplift, and potential snow load. Following the manufacturer’s specifications and architectural plans for clip type and placement is non-negotiable. It ensures the roof can handle the specific environmental stresses it will face, providing a secure and durable covering for the building.
A Guide to Common Roofing Clip Types
Choosing the right roofing clip is just as important as selecting the right panel. The clip is the unsung hero that holds the entire system together, securing the roof against wind, weather, and time. Using the wrong one can lead to panel damage, leaks, or even a voided warranty, turning a profitable job into a costly callback. Think of clips as the foundation of your installation’s integrity; they’re responsible for managing thermal movement, bearing structural loads, and ensuring the roof performs as designed for decades.
Let’s walk through the most common types of clips you’ll encounter on the job so you can pick the perfect one for every project. From standard standing seam clips that create a flawless, fastener-free finish to specialized options for solar arrays and snow retention systems, knowing the difference is key to a long-lasting, professional installation. Getting this small detail right is what separates the pros from the amateurs and ensures your work stands the test of time.
Standing Seam Metal Roof Clips
These are the workhorses for metal roofing. Standing seam clips are specifically designed to secure metal roof panels to the deck without puncturing the panel’s surface, which is crucial for maintaining a weathertight seal. They are typically two-piece systems that allow for thermal expansion and contraction, preventing stress on the panels and fasteners. For example, you’ll often see clips made for specific profiles like Snap Lock roof panels, where the clip is hidden within the seam. This creates a clean, fastener-free appearance that clients love and is fundamental to the longevity and performance of the roof.
Fixed vs. Slotted Base Clips
Not all standing seam clips are created equal. The main distinction you’ll need to make is between fixed and slotted clips. Fixed clips lock the panel firmly in place and are best for shorter panel runs where thermal movement is minimal. Slotted clips, on the other hand, have an elongated hole that allows the fastener to move as the metal panel expands and contracts with temperature changes. As a rule of thumb, you should use slotted clips on any panel runs longer than 40 feet to prevent buckling, oil canning, and unnecessary stress on the entire roof system.
H-Clips for Panel Support
Moving from the metal panels to the roof deck, you’ll find H-clips. These small but mighty pieces of metal are not for securing the final roofing material. Instead, they are used between the edges of plywood or OSB sheathing panels. H-clips provide edge support, reducing deflection and ensuring the sheathing lays flat and even. They also create a consistent, small gap between panels, which is essential for allowing the wood to expand and contract without buckling. This simple step is a requirement in many building codes and is critical for creating a stable, long-lasting roof deck that will properly support your metal panels.
Ridge and Valley Clips
Ridges and valleys are high-stress areas on any roof, and they require specific attention. Ridge and valley clips are used to secure the ends of panels in these critical transition zones. Like standing seam clips, they are a hidden part that fastens a roof panel to the deck without creating a point of entry for water. These clips come in various materials, from galvanized steel to copper, and it’s vital to match the clip material to your panel material to prevent galvanic corrosion. Proper installation here is non-negotiable for a leak-free roof that can handle heavy rain and snowmelt without issues.
Snow Retention Clips
In areas with heavy snowfall, managing the snow load on a metal roof is a major safety concern. Snow retention clips are designed to work with snow guards or snow rail systems to prevent dangerous “roof avalanches.” These clips attach directly to the standing seams of the panels, providing a solid anchor point for the snow retention system without penetrating the roof. Using a clip specifically engineered for this purpose is essential, as improvising or using the wrong type can compromise the roof’s integrity and potentially void its engineering warranty. It’s a small component that plays a huge role in safety.
Solar Panel Mounting Clips
More and more clients are adding solar panels to their metal roofs, and doing it right is key. Solar panel mounting clips are designed to attach solar racking systems directly to the standing seams. This is a huge advantage because it allows for a secure installation without drilling a single hole into the roof panels, eliminating potential leak points. These clips clamp onto the seam, creating a sturdy, non-penetrating base for the solar array. This method preserves the roof’s warranty and ensures both the roof and the solar system perform as intended for decades to come.
How to Choose the Right Roofing Clip
Picking the right roofing clip is about more than just finding one that fits the panel. It’s a decision that directly impacts the roof’s longevity, durability, and ability to withstand the elements. The right clip ensures the entire system functions as designed, from managing thermal movement to resisting wind uplift. Think of clips as the unsung heroes of the roofing system—small components that do the heavy lifting to hold everything together securely for decades.
Making the right choice means looking at the project from all angles. You need to consider the specific roofing material you’re working with, the local climate, and the structural demands of the building. It also means doing your homework on local building codes and sticking to the manufacturer’s specifications like glue. Getting any of these details wrong can lead to premature roof failure, voided warranties, and unhappy clients. Let’s walk through the key factors you need to weigh to select the perfect clip for every job, ensuring a secure, professional, and long-lasting installation.
Match Your Clip to Your Roofing Material
Your first step should always be to check the roof panel manufacturer’s recommendations. They’ve done the engineering and testing to determine which clips work best with their system. Using a non-specified clip can void the warranty and compromise the roof’s integrity.
A critical piece of this is material compatibility. Mixing incompatible metals can cause galvanic corrosion, a process where one metal corrodes when it comes into contact with another in the presence of an electrolyte, like rainwater. For example, you should never use a galvanized steel clip with a copper roof. The material and quality of the clip must match what was used in the original engineering tests to ensure the system performs as expected over its entire lifespan.
Consider Your Climate and Environment
The environment where you’re building plays a huge role in clip selection. A roof on the coast faces constant salt spray, which is incredibly corrosive. In this scenario, stainless steel clips are your best bet because they offer superior corrosion resistance. The same goes for roofs on buildings in industrial areas with higher levels of air pollution.
Beyond corrosion, think about weather patterns. If you’re in a region with heavy snowfall, you’ll need clips that can handle the significant weight, or “snow load.” In hurricane-prone areas, the primary concern is wind uplift, so you’ll need a clip system specifically engineered and tested to withstand high wind speeds. Always choose a clip designed to handle the specific environmental challenges of your project’s location.
Calculate Load and Structural Needs
Every roof has to manage different types of force, or “loads.” This includes the static weight of the materials (dead load), temporary weight like snow or maintenance workers (live load), and the upward pull from wind (wind uplift). Your clip system is your primary defense against these forces. The type of clip, its gauge, and the spacing between them are all calculated to handle the specific loads your roof will face. For example, H-clips are often used with roof sheathing to provide edge support and prevent panels from sagging between trusses, which helps avoid water pooling and potential leaks.
Check Local Building Codes
Before you order a single clip, you need to know what your local building codes require. These regulations are not suggestions—they are the law, and they can vary dramatically from one town to the next. Codes often specify minimum requirements for things like wind uplift resistance, snow load capacity, and even the types of materials you can use. For instance, the International Residential Code (IRC) might suggest using H-clips in certain situations, but your local authority has the final say. Always confirm the requirements with your local building department to ensure your installation is fully compliant.
Account for Thermal Movement
Metal roofing panels expand and contract with temperature changes, and your clip system needs to accommodate this movement. This is where slotted or floating clips come in. These two-piece clips have a base that attaches to the roof deck and a top that holds the panel. The design allows the panel to slide back and forth as it expands and contracts, preventing stress on the fasteners and panels. This helps stop issues like oil canning or fastener pull-out. Fixed clips, on the other hand, are used to pin the panel in place, typically at the eave or ridge, to direct thermal movement.
Follow Manufacturer Specs
This point is so important it’s worth repeating: always follow the manufacturer’s specifications. The panel manufacturer has invested heavily in testing their systems to achieve specific performance ratings for wind, fire, and impact. These ratings are only valid if the system is installed exactly as specified, including using the correct clips, fasteners, and spacing. Deviating from the instructions can not only lead to roof failure but will almost certainly void the manufacturer’s warranty, leaving you liable for any issues. When you review product details, be sure to understand the full scope of the system and any associated costs.
Installing Roofing Clips the Right Way
Putting clips on correctly is just as important as choosing the right ones. A solid installation ensures the roof performs as designed, holding up against wind, rain, and thermal movement for years to come. It’s all about precision and following a clear process from start to finish. Let’s walk through the key steps to get it right every time.
Plan Your Installation
Before you even step onto the roof, your plan should be solid. The most critical rule is to follow the roof manufacturer’s recommendations. Their specs are based on extensive testing and are designed to ensure the system’s integrity. Always choose clips based on what the manufacturer requires for that specific panel profile and substrate. This isn’t just about best practices—it’s often a condition of the warranty. Double-check the engineering documents for the project to confirm you have the right clips and fasteners on hand for the job.
Get Spacing and Alignment Right
Proper spacing is non-negotiable for a secure roof. These clips are what attach the roofing panels to the roof deck, so their placement determines the system’s strength. As a general guideline, you’ll place a clip about every 12 inches along the panel’s length. However, this can change based on the project’s location and specific wind-uplift requirements. Always verify the required spacing by checking local building codes and the manufacturer’s installation manual. Consistent, accurate alignment is just as important for a professional finish and proper panel engagement.
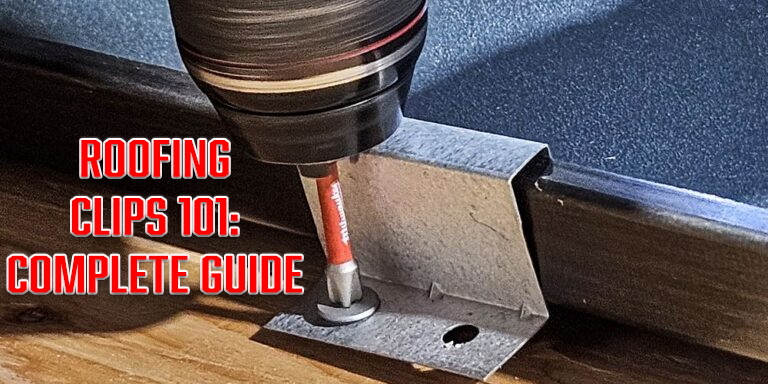
Master Your Fastening Technique
Your technique for securing the clips makes all the difference. Start by hooking the clip over the male leg of the roof panel. It should sit flush and straight. Next, use the specified fasteners—whether screws or nails—to secure the clip firmly to the roof deck. The clip should be snug against the panel without causing any distortion or oil canning. Using the right metal seaming tools afterward will ensure the panels lock together perfectly over the clips, creating a weathertight and durable seam.
Common Mistakes to Avoid
Even experienced roofers can make mistakes, but a few common errors are easy to prevent. The biggest one is using the wrong type of clip for the panel system. This can instantly void the roof’s engineering warranty or material approval, leaving you liable. Another issue is improper fastening—over-driving or under-driving screws can compromise the clip’s holding power. While some minor installation errors might not cause a major leak right away, they create weak points that can lead to panel disengagement or other failures down the road.
Key Safety Checks
Finally, always perform safety and compliance checks. Before you begin, confirm with your local building department whether specific clips, like H-clips for sheathing, are required in your area. Codes can vary significantly from one jurisdiction to another. Once the clips are installed, give them a quick inspection to ensure they are all properly seated and fastened before you lay the next panel. This final check helps you catch any issues early and guarantees that the finished roof is safe, secure, and built to last.
Top Brands for Roofing Clips and Tools
When you’re on a job, the quality of your materials is just as important as the quality of your tools. A perfectly installed roof depends on having reliable clips and the right equipment to secure them. Choosing a reputable brand means you’re getting products that are tested, trusted, and designed to last. It saves you from callbacks and protects your reputation. Below are some of the top names in the industry for both roofing clips and the essential tools you’ll need to get the job done right. These companies have built a solid reputation among professionals for their commitment to quality, innovation, and durability.
Stortz Tools
You can’t talk about quality roofing tools without mentioning Stortz. While they are renowned for their hand tools, having the right equipment to install clips is half the battle. Their lineup of metal roofing tools includes everything from seamers to snips and hammers that are essential for any metal roofing project. Professionals rely on Stortz because their tools are built to withstand the daily demands of the job site. When you’re working with high-quality clips, pairing them with durable, precise tools ensures a clean, secure installation every time. Their long-standing commitment to quality makes them a staple in any serious roofer’s toolkit.
S-5!
S-5! is a major player in the metal roofing world, especially when it comes to attachments. They are known for their innovative, non-penetrating clamp systems that protect the integrity of the roof panels. If you’re attaching anything from solar panels to snow guards, S-5! products are designed for incredible strength and durability. Contractors favor them because their solutions are engineered to be easy to install without compromising the roof’s warranty or performance. Their extensive testing and engineering mean you can trust their clamps to hold up against harsh weather conditions, providing a secure attachment that lasts the life of the roof.
AceClamp
AceClamp is another excellent choice for securing rooftop accessories, particularly solar panels. They specialize in versatile and dependable clamping solutions that are designed to work with a wide variety of metal roof profiles. What makes AceClamp stand out is their focus on creating strong, reliable connections that are also fast to install. Their patented designs, like the slide-pin mechanism, help reduce installation time without sacrificing holding power. For roofers who need a secure fit and long-lasting performance for various rooftop additions, AceClamp offers well-engineered products that you can count on for a secure and professional finish.
SnapNrack
For professionals working on solar installations, SnapNrack is a go-to brand. They focus on creating complete mounting solutions that make the entire installation process more efficient. Their systems are designed with the installer in mind, featuring components that are easy to handle and assemble on the roof. SnapNrack products are engineered to simplify the workflow, from laying out the array to securing the panels. This focus on user-friendliness, combined with robust engineering, helps solar contractors complete jobs faster while ensuring a secure and reliable installation that will stand the test of time.
IronRidge
IronRidge has built a strong reputation for its tough, high-quality solar mounting systems. Their products are known for being incredibly durable and able to withstand extreme weather, which is a critical factor for any rooftop installation. Contractors choose IronRidge for its straightforward installation process and the reliability of its components. The systems are designed to be versatile, working well on a variety of roof types. When you need a solar mounting solution that is as strong as it is easy to work with, IronRidge provides a range of products that consistently deliver on performance and durability.
BPD Building Products
BPD Building Products offers a broad selection of essential roofing accessories, including a variety of clips and fasteners for both commercial and residential projects. They are a reliable source for the fundamental components that hold a roofing system together. Professionals turn to BPD Building Products because their offerings are designed to meet or exceed industry standards for quality and performance. Whether you need clips for a standing seam roof or fasteners for a different application, they provide dependable products that help ensure the longevity and integrity of your roofing work.
K&M Sheet Metal
K&M Sheet Metal is a trusted name for a range of roofing tools and accessories, including the clips needed for many metal roofing applications. They have a strong focus on producing quality components that roofing professionals can depend on. What makes K&M Sheet Metal a solid choice is their commitment to both their products and their customers. They understand the needs of sheet metal workers and roofers, providing reliable clips and tools that perform well on the job. For those who value quality craftsmanship and dependable service, K&M is a brand that consistently delivers.
How to Maintain and Inspect Your Roofing Clips
A metal roof is only as strong as its weakest component, and that often comes down to the clips holding everything together. Proper maintenance and regular inspections aren’t just about ticking a box; they’re about protecting the integrity of the entire roofing system and upholding your reputation for quality work. Catching a small issue like a corroded or loose clip early can prevent catastrophic failures, water damage, and expensive callbacks down the road. Think of it as preventative care for the roof. A little time spent on a scheduled inspection can save you—and your client—a massive headache later. By establishing a clear routine for checking on these critical components, you ensure the roof performs as designed for its entire lifespan, through every season and storm.
Create a Regular Inspection Schedule
The best way to stay ahead of potential problems is to have a consistent inspection schedule. Don’t wait for a leak to tell you something is wrong. For most commercial roofs, a biannual check—once in the spring and once in the fall—is a solid plan. It’s also smart to perform an inspection after any major weather event, like a hurricane, hailstorm, or heavy snow. Regular roof inspections are essential for spotting and addressing issues before they become serious problems. Creating a simple checklist for each property and documenting your findings helps you track the roof’s condition over time and provides a valuable record for your client.
What to Look For: Signs of Wear and Damage
When you’re up on the roof, you need to know exactly what to look for. Start with a visual check of the clips themselves. Are there any signs of rust, corrosion, or cracks? Pay close attention to the fasteners; are they secure, or have any backed out? Check for any clips that seem loose or have shifted from their original position. It’s also important to look for secondary signs of trouble. For instance, you should always look for leaks in the attic and on ceilings, as water intrusion is a clear indicator that something in the roofing system, potentially the clips, has failed.
When and How to Replace Clips
If you find a damaged, corroded, or loose clip, don’t hesitate to replace it. Leaving a compromised clip in place can put extra stress on the surrounding clips and panels, leading to a domino effect of failure. A well-maintained roof is the first line of defense to protect a home from water intrusion, so prompt action is key. When replacing a clip, always follow the manufacturer’s specific guidelines. Using the wrong type of clip or fastener can void warranties and compromise the roof’s structural integrity. Make sure your replacement clip is compatible with the roofing system and made from the same or a more durable material.
Protecting Clips from the Elements
You can extend the life of roofing clips by taking a few protective measures. The biggest enemies are moisture and debris. Make it a habit to remove debris like leaves, branches, and dirt from the roof surface, gutters, and around the clip locations. When debris piles up, it traps moisture against the metal, which accelerates corrosion. Ensuring the roof has proper drainage is also critical. When water can flow off the roof freely, it spends less time in contact with the clips and fasteners, significantly reducing the risk of rust and long-term wear.
Tips for Long-Term Performance
Ultimately, the long-term performance of roofing clips comes down to two things: quality materials and consistent upkeep. Start by using high-quality clips made from materials designed to withstand your specific climate and environmental conditions. Galvanized steel, stainless steel, and aluminum all offer different levels of corrosion resistance. Once installed, the key is sticking to your maintenance schedule. As experts note, consistent roof maintenance is the best way to prolong the lifespan of the entire system. By combining top-tier components with regular, detailed inspections, you ensure the roof remains secure and weathertight for decades.
Related Articles
Frequently Asked Questions
What’s the single biggest mistake you see roofers make with clips? Hands down, the biggest mistake is ignoring the manufacturer’s specifications. It’s tempting to think a clip is just a clip, but roofing systems are engineered to work together as a complete package. Using a non-approved clip for a specific panel can compromise the roof’s wind uplift rating and will almost certainly void the warranty, which can turn into a major liability for you and your business.
Why is matching the clip material to the roof panel so important? This is all about preventing a chemical reaction called galvanic corrosion. When two different metals are in contact with moisture, one can start to corrode at a much faster rate. For instance, if you use a standard galvanized clip on a copper roof, the clip will quickly deteriorate and fail. Matching your materials ensures the entire system ages gracefully and the fasteners last as long as the roof itself.
When should I absolutely use a slotted clip instead of a fixed one? You should always reach for slotted clips on longer panel runs, typically anything over 40 feet. Metal panels expand and contract significantly with temperature changes, and slotted clips are designed to allow for that movement. This prevents the panels from buckling or putting stress on the fasteners. Fixed clips are better suited for shorter runs or for pinning the panel at one end, like at the eave, to control the direction of the expansion.
Can I use clips from one brand with panels from another? I would strongly advise against it. A roof’s performance ratings for wind and weather are based on tests of the entire system as designed by the manufacturer. Swapping out a component like a clip, even if it seems to fit, can lead to an improper seam engagement and potential leaks. Sticking with the specified components is the only way to guarantee the roof performs as intended and the warranty remains intact.
How often do I really need to inspect the clips on a finished roof? A proactive approach will save you headaches later. For most roofs, a biannual inspection in the spring and fall is a solid plan. It’s also a good idea to check things out after any severe weather event, like a hurricane or major hailstorm. This allows you to spot any loose fasteners or early signs of corrosion before they become a serious problem for your client.