

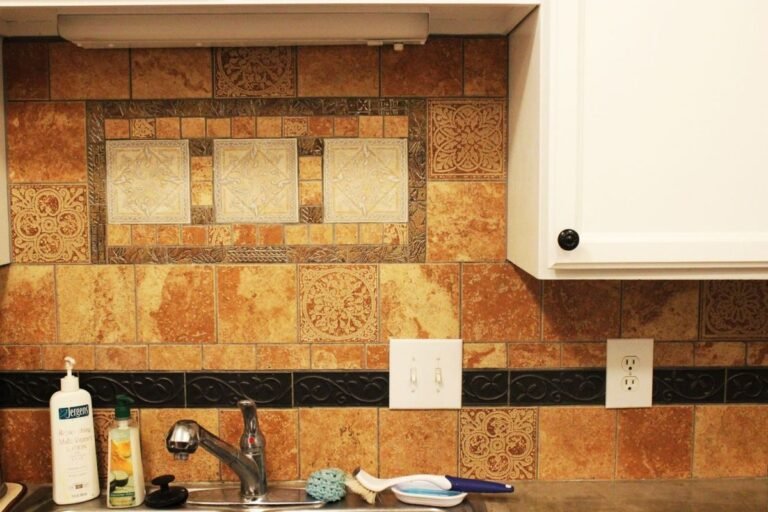


The brown Tuscan-style tile covered a large part of Brittney Smart’s kitchen, running behind the sink and stove with decorative inserts, a dark floral border, and a framed tile design above the sink. She wanted the backsplash gone, but replacing it gave her a chance to choose from plenty of newer tile styles and layouts.

Instead, Brittney Smart went back to a backsplash she had always loved. She chose white subway tile and installed it in a traditional staggered pattern, using half tiles to offset alternating rows rather than switching to a newer stacked or decorative layout.
The old backsplash came down while the white upper cabinets, charcoal base cabinets, appliances, and kitchen footprint stayed in place. Her laminate countertops had already been covered with an Ardex Feather Finish concrete surface, so the finished kitchen pairs that gray-brown counter with white subway tile and contrasting gray grout.
Tuscan Tile Ran Across the Stove Wall and Peninsula

Brown field tile covered the wall behind the range, interrupted by square patterned inserts and a black ornamental band that ran through the center. The backsplash shared its rust and tan tones with the former countertop palette, but Brittney’s new gray concrete finish had already moved that surface in another direction.

White upper cabinets and charcoal lowers stayed on either side of the backsplash, making the tile one of the few parts of the kitchen still tied to the Tuscan look. The first two views show how much wall space it occupied, including the corner beside the peninsula.
Concrete Counters Stayed While the Backsplash Became the Next Project

Brittney had no reason to change the countertop footprint when she turned to the backsplash. The broad peninsula kept its rounded outer edge, the L-shaped work surface stayed beside the stove, and the new concrete finish remained beneath the tile.

That matters because the backsplash replacement was not part of a kitchen gut job. The dark lower cabinets, white range, microwave, hardwood floor, and counter shape can all be traced from the old kitchen into the finished one.
Sink Wall Had the Most Elaborate Tuscan Tilework

Above the sink, the backsplash turned into a full decorative panel. Three raised cream tiles sat inside a border made from smaller rust pieces, with patterned squares placed around the frame and the black floral strip crossing below it.
Brittney’s new backsplash would remove that hierarchy. Instead of reserving the sink wall for a special mosaic, she planned to carry the same white rectangle and staggered joint across the entire area.
Old Tile Did Not Come Off Without Taking Wall Surface With It

Removal began at an exposed edge with a chisel placed behind the tile. Once work moved across the backsplash, sections of paper and gypsum came off with it, showing why a clean tile-by-tile removal was not going to leave a ready surface behind.

The second image captures the change in approach. Rather than keep fighting each piece, cuts were made around sections of the backsplash so damaged wall material could come out with the tile. The wall then had to be repaired before Brittney could install the new backsplash.
Brittney Chose White Tile, 1/8-Inch Spacers, and a Classic Layout

The replacement starts with basic materials: white rectangular tile, Mapei Type 1 adhesive, a notched trowel, and 1/8-inch spacers. There are no accent pieces, decorative borders, or contrasting tile shapes waiting to be inserted into the field.

Adhesive went onto the repaired wall in ridges before the first row was pressed into place along the countertop. From there, each second row begins with a half tile, which shifts the vertical joints and creates the old-school subway pattern Brittney wanted.
Cut Edges Were Hidden Where Faceplates Would Cover Them

A repeating brick pattern leaves less room to disguise poor cuts around switches and outlets. Brittney positioned cut tile edges beside the electrical boxes, where the switch plates could cover them once the backsplash was finished.

The double-switch opening shows how the pattern was maintained through an interruption in the wall. Rather than stop a row at the box and restart without regard for the joints, tiles were notched so the running bond continued around it.
Staggered Rows Covered the Sink Wall Before Grout Went In

Once the tile reached the upper cabinets, the change from the old sink wall was already clear. The framed Tuscan centerpiece was gone, replaced by one repeated rectangle from the counter to the cabinet opening.
Spacers still separate every tile in this stage, so the final grout lines have not taken over yet. Brittney let the adhesive set for 24 hours before moving to grout.
Gray Grout Made the Old-School Pattern Stand Out

Dark grout was pushed across the tile with a float and into each joint, covering much of the white surface during application. After excess grout was wiped away, those lines became the part that defined the staggered pattern.
The grout used for the project was Natural Gray, giving each white rectangle an outline instead of letting the backsplash read as one broad white field. That contrast is what makes the traditional brick arrangement so easy to see in the finished kitchen.
Same Sink Wall Now Uses One Tile From Counter to Cabinet

The finished sink wall has no framed center panel, black floral band, or patterned square inserts. White subway tile runs behind the faucet, around the outlets, and up into the recessed section beneath the upper cabinets.

Brittney kept one strong accent in that recess: the aqua light fixture above the sink. Against the old backsplash it would have competed with several colors and motifs. Against the white tile and gray grout, it sits apart from the wall rather than becoming one more element inside a patterned surface.
Subway Tile Continues Past the Sink and Around the Kitchen

The same pattern moves from the sink wall toward the range and around the corner without switching formats. Brittney did not use a different tile behind the stove, add a border at countertop height, or create a second focal section to replace the one she removed.

That restraint makes the choice feel tied to the pattern itself. She wanted traditional subway tile, so the backsplash uses it across the kitchen rather than treating it as a base for another set of accents.
Tuscan Ornament Gave Way to a Pattern Brittney Wanted to Keep

The final comparison puts both approaches in the same frame. On the left, rust tile, patterned squares, a black border, and the sink mosaic divide the backsplash into several layers. On the right, one white tile shape repeats from end to end with gray grout marking the staggered joints.
Brittney did not choose subway tile because it was the newest backsplash idea. She chose a pattern she loved, even though its roots go back far beyond the kitchen trends replacing it today. The concrete counters stayed, the cabinets stayed, and the kitchen footprint stayed; the surface between them moved from Tuscan ornament to an old-school pattern she preferred.
Would you have chosen gray grout for the white subway tile, or gone darker to make the old-school pattern stand out even more?