
On any job site, time is your most valuable asset. The faster you can complete a job without sacrificing quality, the more profitable your business becomes. That’s why it’s crucial to see certain tools not as expenses, but as investments in productivity. Electric sheet metal shears are one of the best investments a professional roofer can make. The upfront cost is quickly offset by the massive reduction in labor time spent on cutting materials. They allow you to work faster, produce cleaner results, and reduce the physical strain on your body. This guide will break down how choosing the right shears can directly impact your bottom line.
Key Takeaways
- Work Smarter, Not Harder: Electric shears make long, straight cuts quickly and accurately, saving you significant time and physical strain compared to using manual snips.
- Match the Tool to Your Materials: When choosing a shear, the most important feature is its cutting capacity. Ensure it can handle the gauge and type of metal you work with most often to guarantee clean cuts and prevent damage to the tool.
- Simple Maintenance Extends Tool Life: Protect your investment with a consistent routine. Wiping down the tool, checking the blades for wear, and storing it in a protective case will keep your shears running smoothly and ensure they’re ready for the next job.
What Is an Electric Sheet Metal Shear?
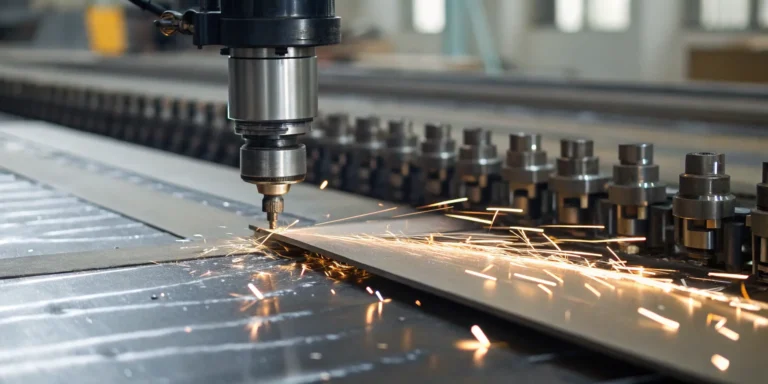
If you’ve ever spent a day making cuts with manual snips, you know how taxing it can be on your hands and how tough it is to get a perfectly straight line. Electric sheet metal shears are the answer. These power tools are designed specifically to make clean, precise cuts through sheet metal with minimal effort. For professional roofers and metal workers, they are an essential piece of kit that saves time, reduces fatigue, and delivers a higher quality finish.
Unlike other cutting tools that can warp or distort the edges of the metal, a good pair of electric shears slices through the material cleanly. This makes them ideal for everything from sizing large roofing panels to fabricating detailed flashing. They give you the power and consistency you need to handle repetitive cuts quickly and accurately, making your entire workflow more efficient. Think of them as the heavy-duty, powered-up version of your most trusted hand snips.
How Do They Work?
The mechanics behind an electric shear are pretty straightforward. Inside the tool, a powerful motor drives a moving cutting blade against a stationary one. This action mimics the clean slicing motion of a pair of high-quality scissors, but with the force and speed that only a motor can provide. As you guide the tool, the blades shear the metal apart, creating a crisp edge without burrs or distortion. This simple yet effective design is what makes them one of the most reliable metal cutting tools available for professional use. The result is a fast, smooth cut that keeps the integrity of your material intact.
Types of Electric Shears
Electric shears generally come in two main styles: single-cut and double-cut. Your choice between them depends on the job at hand.
Single-cut shears have one moving blade that cuts against a fixed blade, functioning almost exactly like a standard pair of scissors. They are great for making quick cuts where you aren’t worried about slight material deformation along the cut line.
Double-cut shears, on the other hand, use three blades. Two stationary outer blades hold the metal flat while a central moving blade cuts, removing a thin strip of material as it goes. This process prevents any warping or curling of the metal on either side of the cut, making them the perfect choice for long, straight cuts where a flawless edge is critical.
Common On-the-Job Applications
You’ll find electric shears on almost any job site where sheet metal is being installed. For roofers, they are indispensable for cutting standing seam panels, valley flashing, and trim pieces to exact measurements. Their speed and precision are a huge advantage when you’re working with long panels high off the ground. HVAC technicians rely on them for fabricating and modifying ductwork, while metal fabricators use them for a wide range of custom projects. They are also perfect for trimming and fitting metal siding and gutter components. Essentially, any application that requires clean, straight, or curved cuts in sheet metal is a perfect job for electric shears.
Key Features of a Pro-Grade Shear
When you’re ready to invest in an electric shear, you’ll quickly notice that not all tools are built the same. The difference between a basic model and a professional-grade tool comes down to a handful of key features that directly impact performance, durability, and the quality of your final product. A pro-grade shear isn’t just about cutting metal; it’s about doing it efficiently, accurately, and safely, day in and day out. Think of it as the difference between a tool that simply gets the job done and a tool that actually makes your job easier and your work look better.
Choosing the right shear means looking beyond the price tag and really understanding how its design and capabilities will hold up on a demanding job site. It’s about picturing yourself on a roof, making a long, straight cut on a standing seam panel. Will the tool feel balanced? Will it power through without stalling? Will the cut be clean enough to not need extra finishing? From the thickness of the metal it can handle to how it feels in your hand after a few hours of work, every detail matters. In this section, we’ll walk through the essential features that separate the best electric shears from the rest, so you can find a reliable tool that becomes a go-to in your kit for years to come.
Cutting Capacity and Material Type
The first thing to check is the shear’s cutting capacity. This tells you the maximum thickness of metal, measured in gauge, that the tool can handle. A shear designed for 22-gauge steel will struggle, or fail completely, with a 16-gauge panel. Pro-grade shears will clearly list their capacity for different materials, as it often varies between mild steel, stainless steel, and aluminum. Getting this right is crucial because using the wrong tool for the job can damage the shear, the material, and your reputation. The goal is to find a tool with the right capacity for the materials you work with most, ensuring your metal cutting tools deliver clean, precise cuts for a perfect fit every time.
Power and Performance
A shear’s power directly translates to its on-the-job performance. A robust motor, typically measured in amps, allows the tool to slice through metal smoothly without bogging down or stalling, especially on thicker materials. For example, a high-performance shear can cleanly cut through 16-gauge steel or 18-gauge stainless steel without a fight. This consistent power not only makes the cutting process faster but also reduces the physical effort required from you. A powerful motor ensures the blades maintain their speed and cutting force, resulting in cleaner edges and less material distortion. It’s the engine that drives the entire operation, so don’t overlook it.
Blade Type and Durability
The blades are where the rubber meets the road—or in this case, where the steel meets the sheet metal. The quality and durability of the blades are critical for performance and longevity. Look for shears with blades made from high-carbon or high-speed steel, as they hold their edge longer and can withstand the rigors of daily use. Many professional models feature four-sided, reversible blades. This clever design means that when one edge gets dull, you can simply rotate it to a fresh, sharp one, extending the life of the blade set significantly. Regularly checking your blades for wear and keeping them sharp is a simple maintenance step that pays off in cut quality.
Ergonomics and Weight
You could be holding this tool for hours, so how it feels in your hand is incredibly important. Ergonomics and weight play a huge role in reducing fatigue and improving control. A well-designed shear will have a comfortable, non-slip grip and a balanced body that doesn’t feel front-heavy. The overall weight is also a key factor—a lighter tool is easier to maneuver, especially when you’re making long cuts or working in awkward positions on a roof. A tool that feels like a natural extension of your hand allows you to work more accurately and comfortably, which is essential for both safety and quality.
Built-in Safety Features
Power tools demand respect, and good design always prioritizes safety. Professional electric shears come with built-in features to protect you on the job. A common and crucial feature is a blade guard, which acts as a physical barrier to keep your fingers away from the cutting action. Another important feature is a lock-on or lock-off switch, which prevents the tool from starting up accidentally. Some models also have variable speed triggers, giving you more control over the cut from start to finish. Always familiarize yourself with a tool’s safety features before you start working—they’re there for a reason.
Cut Quality and Precision
Ultimately, the reason you buy a shear is for the quality of its cut. A pro-grade tool should deliver clean, straight, and curved cuts with minimal distortion or burring on the metal’s edge. Unlike other cutting methods that can warp or damage the material, a good shear slices through cleanly, leaving a workable, professional finish. This precision is vital for creating panels and flashing that fit together perfectly. The ability to make tight turns without creating waste material is a hallmark of high-quality metal bending and cutting tools, ensuring your finished work is both functional and aesthetically pleasing.
How to Use Electric Shears Safely
Electric shears make quick work of tough cuts, but that power demands respect. Like any tool on the job site, using them correctly is key to staying safe and getting clean results. A few simple habits can make all the difference, ensuring you finish your day with all your fingers intact and a job well done. It’s not about being overly cautious; it’s about being a pro who knows their tools inside and out. Let’s walk through the essential safety practices that should be second nature every time you pick up your shears.
Your Essential Safety Gear
Before you even plug in your shears, you need to gear up. Sheet metal edges are unforgiving, and the cutting process can send small, sharp fragments flying. Always wear the proper Personal Protective Equipment (PPE). Start with a good pair of cut-resistant gloves to protect your hands from sharp edges and burrs. Safety glasses are non-negotiable to shield your eyes from debris. Depending on the noise level of your specific tool and work environment, hearing protection is also a smart idea. Think of PPE as your first line of defense—it’s the easiest and most effective way to prevent common job site injuries.
Proper Setup and Operation
A safe cut starts before the blade even moves. Always inspect your electric shears before use. Make sure the power cord isn’t frayed and that all safety features, especially the blade guards, are in place and functioning correctly. These guards are there for a reason: to keep your fingers away from the cutting action. When you’re ready to cut, secure the metal workpiece with clamps if possible so it doesn’t shift unexpectedly. Keep your hands and fingers clear of the cutting path at all times. Never extend your hands beyond the guard—it’s a simple rule that prevents the most serious accidents.
Workplace Safety Practices
Your immediate surroundings play a huge role in safety. A cluttered workspace is a hazardous one. Keep your cutting area clean, well-lit, and free of tripping hazards like stray cords or scrap material. Before you start a cut, make sure your footing is stable and your body is balanced. Always be aware of who is around you, and ensure others stay clear of your work zone. Part of being a professional is maintaining a safe environment not just for yourself, but for your entire crew. Making sure your metal cutting tools are in proper working order before you begin is a fundamental step in this process.
How to Prevent Common Hazards
Some of the biggest risks come from bad habits or attempts to take shortcuts. First, never tamper with the built-in safety features of your shears. It might seem tempting to adjust a finger protector for a better view, but doing so dramatically increases your risk of injury. Second, pay attention to what you’re wearing. Avoid any loose clothing, dangling drawstrings, or jewelry that could get caught in the tool’s moving parts. By understanding and avoiding these common hazards, you can operate your shears with confidence and control, ensuring every cut is as safe as it is precise.
Electric Shears vs. Other Cutting Tools
When you’re working with sheet metal, you have a few options for making your cuts. While every tool has its place in your truck, knowing which one to grab for a specific task can save you time, effort, and a lot of frustration. Electric shears are a game-changer for efficiency and precision, but it’s helpful to see how they stack up against other common tools like manual snips and nibblers.
The right tool depends entirely on the job at hand. Are you making long, straight cuts on a standing seam roof? Or are you shaping a small, intricate flashing piece? Each scenario calls for a different approach. Understanding the strengths and weaknesses of each cutting method helps you work smarter, not harder. We’ll break down the key differences in how these tools operate, their performance on the job, and what you can expect in terms of cost. This way, you can make an informed decision and build a toolkit that’s ready for anything.
Electric Shears vs. Manual Snips
The most obvious difference here is power versus muscle. Manual snips, or tin snips, are essential for any roofer and are perfect for small, quick cuts, tight corners, and intricate shapes where you need maximum control. They’re lightweight, portable, and don’t require a power source. However, relying on them for long cuts across a full panel is a recipe for a sore hand and a wavy, uneven edge.
This is where electric shears shine. They turn a physically demanding task into a smooth, fast operation. An electric shear glides through metal, giving you a consistently clean and accurate cut that’s difficult to achieve by hand. For any job that involves repetitive cuts or long runs, the right metal cutting tools pay for themselves in time saved and reduced fatigue.
Shears vs. Nibblers
At a glance, shears and nibblers seem similar—they’re both powered tools that cut sheet metal. But they work in fundamentally different ways. An electric shear uses two blades in a scissor-like motion to slice through the material, creating a clean cut without producing any waste. This makes for a tidy worksite and a smooth, continuous cutting process.
A nibbler, on the other hand, cuts by punching out tiny, crescent-shaped pieces of metal. This “nibbling” action is fantastic for making tight, curved cuts and for cutting corrugated or trapezoidal panels without distorting the metal’s profile. The downside is the mess. Those tiny metal bits get everywhere and have to be meticulously cleaned up to prevent rust stains on a new roof.
Comparing Performance and Speed
When it comes to straight-up speed, electric shears have a clear advantage over manual methods. You can cut through a long metal panel in a fraction of the time it would take with snips, and with far less effort. The performance can vary between different types of shears. For instance, double-cut shears are incredibly efficient because they use three blades to remove a thin strip of material as they cut. This process results in a fast, clean edge with virtually no warping or distortion on either side of the cut line.
Single-cut shears are also powerful performers, often used for heavier gauge metals. While they might cause some minor bending on the waste edge, they get the job done quickly.
Comparing Costs
There’s a significant price difference between manual snips and electric shears. A good pair of snips is a relatively small, essential purchase for any toolkit. Electric shears, however, are a more substantial investment. The price reflects their complex mechanics, powerful motors, and the high-quality materials needed to cut through metal day after day.
While the upfront cost is higher, it’s important to think about the long-term value. The speed and efficiency of an electric shear can dramatically cut down on labor time, allowing you to complete jobs faster. This means you can take on more work and increase your earning potential. For any professional doing a significant amount of sheet metal work, the cost is easily justified by the gains in productivity and cut quality.
How to Maintain Your Electric Shears
Your electric shears are a serious investment, and like any high-performance tool, they need regular care to keep them running smoothly and cutting precisely. A few minutes of maintenance after a job can save you hours of frustration and extend the life of your tool significantly. Think of it as protecting your investment and ensuring your shears are always ready for the next project. Consistent upkeep prevents unexpected breakdowns, guarantees cleaner cuts, and keeps your tool safe to operate. It’s a simple habit that separates the pros from the amateurs and ensures your equipment won’t let you down when you need it most.
By building a simple maintenance routine, you’re not just cleaning a tool; you’re actively managing its performance and longevity. Neglecting your shears can lead to dull blades that chew through metal instead of slicing it, a motor that strains under pressure, and a tool that becomes unreliable right in the middle of a critical task. On the other hand, a well-maintained shear feels responsive, cuts effortlessly, and delivers the professional-grade results your clients expect. This section will walk you through the essential steps for inspection, blade care, storage, and troubleshooting to keep your electric shears in peak condition.
Your Regular Inspection Checklist
Getting into the habit of a quick post-job inspection will make a world of difference. Before you pack up for the day, take a moment to wipe down your shears with a soft, dry cloth to remove any metal shavings, dust, or debris. This simple step prevents buildup that can interfere with the tool’s mechanics. Next, check the moving parts and apply a few drops of quality lubricating oil to keep the action smooth and prevent rust. It’s also a good idea to inspect the power cord for any frays or damage and ensure all screws and bolts are tight. This routine check only takes a couple of minutes but is the best way to catch small issues before they become big problems.
Caring For and Replacing Blades
The blades are where the magic happens, so keeping them in top condition is non-negotiable for professional results. Regularly inspect the blades for signs of wear, such as nicks, chips, or a dull cutting edge. For minor dullness, some blades can be sharpened, but always follow the manufacturer’s instructions to maintain the correct angle. However, once blades are significantly worn or damaged, it’s time for a replacement. Pushing a dull blade through metal not only produces sloppy, burred cuts but also puts unnecessary strain on the shear’s motor. Investing in a fresh set of blades is an easy way to restore your tool’s performance and ensure every metal cutting job is clean and precise.
Storing Your Shears Correctly
How you store your shears is just as important as how you clean them. Tossing them into a crowded toolbox is a recipe for damage. Always store your electric shears in a dry, secure location to protect them from moisture and accidental drops. The best option is to keep them in their original protective case. This not only shields the tool from impact but also keeps dust and debris out of the motor and mechanical parts. A good case also provides a designated spot for accessories like wrenches and spare blades, so everything you need is in one place. Proper storage is a simple step that protects the body, blades, and internal components, ensuring your shears are ready to go when you are.
How to Troubleshoot Common Issues
Even with perfect maintenance, you might occasionally run into a snag. If your shears aren’t cutting as they should, start with the most common culprits. First, check for dull or improperly installed blades, as this is the number one cause of poor performance. Next, inspect the cutting area for any debris or metal fragments that could be jamming the mechanism. If the tool feels sluggish or is overheating, it might be a sign that it needs better lubrication. A quick clean and oiling can often resolve the issue. If you’ve checked these things and the problem persists, it may be time to consult the user manual or contact a professional for service.
How to Choose the Right Electric Shears
Picking the right electric shears isn’t just about finding a tool that cuts metal. It’s about finding the right partner for your specific jobs—one that can handle the materials you work with day in and day out, feels right in your hands, and won’t quit on you mid-cut. With so many options on the market, it’s easy to feel overwhelmed. Let’s break down the key factors to consider so you can confidently choose a tool that will make your work faster, cleaner, and more precise.
Key Specifications to Look For
Before you even look at a brand name, you need to know what the tool is capable of. The most important spec is the cutting capacity, which tells you the maximum thickness of metal the shears can handle. This is usually measured in gauge. For example, a standard shear might cut up to 16-gauge steel and 18-gauge stainless steel. Always match the tool’s capacity to the materials you cut most often. Also, consider the power source. Cordless models offer incredible freedom on the roof, while corded shears provide consistent power for shop work. Look for features like variable speed control, which gives you more precision when starting a cut or navigating tricky curves.
Top Brands to Consider
When you’re investing in a professional tool, the brand name does carry weight. Established brands like Makita, DEWALT, and Milwaukee have earned their reputations by building durable, reliable tools that stand up to job site abuse. But a name is just a starting point. A top-tier brand should also offer excellent customer support, a solid warranty, and easy access to replacement parts like blades. When you’re comparing different metal cutting tools, look into what other professionals are saying. A tool that is widely trusted by your peers is often a safe bet.
What to Ask Before You Buy
To narrow down your options, ask yourself a few practical questions. First, what specific tasks will this tool be used for? If you’re making long, straight cuts on standing seam panels, your needs will be different than if you’re fabricating intricate flashing details. Next, think about ergonomics. How does the tool feel in your hand? Is it well-balanced, or will it cause fatigue after a few hours of use? Finally, consider the long-term cost of ownership. How much are replacement blades, and how easy are they to find and install? Answering these questions will help you move beyond the marketing and find a shear that truly fits your workflow.
Understanding the Price Range
Electric shears come in a wide range of prices, and you generally get what you pay for. Entry-level models might be fine for occasional, light-duty tasks, but they often lack the power and durability needed for professional roofing work. Mid-range and high-end shears are built with better materials, more powerful motors (often brushless for longer life), and superior blade quality. While the upfront cost is higher, investing in a professional-grade tool from a reputable supplier pays off in the long run through greater efficiency, fewer breakdowns, and cleaner results that reflect the quality of your craftsmanship.
Related Articles
Frequently Asked Questions
What’s the real-world difference between single-cut and double-cut shears? Think of it this way: a double-cut shear is your go-to for finish work where both sides of the cut need to be perfect. Because it removes a tiny strip of metal as it cuts, it leaves both the panel you’re installing and the leftover piece completely flat and free of distortion. A single-cut shear is more like a powered set of snips. It’s great for rough cuts or when the waste side of the metal doesn’t matter, as it can cause a slight curl on that edge.
Are electric shears only good for straight lines, or can they handle curves? They are surprisingly nimble and can absolutely handle curves. A quality electric shear gives you enough control to follow a scribed arc or make gradual curved cuts for flashing and custom fittings. While they won’t make the hairpin turns you can get with a pair of hand snips, they are far more versatile than many people assume and are perfect for most radiused cuts you’ll encounter on a typical job.
How often should I actually be replacing the blades? There’s no magic number of hours, as it really depends on the gauge and type of metal you’re cutting. The best way to know is to pay attention to the tool’s performance. If you start to feel like you have to force the shear through the metal, or if the cut edges are becoming ragged and burred, it’s time for a change. Many pro-grade shears have four-sided blades, so your first step should be to simply rotate the blade to a fresh edge before buying a whole new set.
Is a cordless electric shear powerful enough for professional use? Absolutely. Modern cordless technology has come a long way, and today’s professional-grade cordless shears have more than enough power to handle the gauges of steel and aluminum common in roofing. The main trade-off is runtime versus the unlimited power of a corded model. For roof work where you’re moving around constantly, the freedom of a cordless tool is a massive advantage. Just be sure to have a spare battery charged and ready to go.
What’s the most common mistake people make when using these shears? The biggest mistake is trying to force the tool to move faster than it wants to cut. A good shear will pull itself along the metal at a steady pace. If you push it too hard, you risk creating a wavy cut, putting unnecessary strain on the motor, and dulling your blades prematurely. Let the tool do the work. Your job is simply to guide it along your cut line and maintain a firm, steady hand.