

You might think packing your clothes for a move would be one of the easiest parts. After all, it’s not like your t-shirts and sweaters are breakable. But the average person owns around 144 pieces of clothing and shoes, which could end up making the task of packing up your closet feel like an endless chore.
Fortunately, there’s a simple solution: slip trash bags over your hanging clothes, zip tie the hangers together, and lay them flat across boxes in the moving truck. In this guide, we break down this go-to method, share other useful packing hacks, and offer practical tips on keeping your clothes organized, protected, and ready to hang in your new space.
Why Moving Hanging Clothes Is Tricky
Moving hanging clothes seems like it should be a simple grab and go, right? But anyone who has tried to wrestle with an armful of hangers knows it can turn into a tangled, frustrating mess.
“One of the simplest ways to move hanging clothes is by laying them flat across the tops of sturdy, packed boxes. This method makes use of otherwise wasted space and stops your clothes from shifting during the drive.”
We’re here to explain common challenges you might face, helping you avoid wasted time, wrinkled clothing, or worse — damaged belongings.
Here are a few reasons packing hanging clothes for moving is trickier than it looks:
- They’re bulky and awkward: Clothes on hangers take up more space than you think and don’t fit neatly into boxes.
- Risk of wrinkles or damage: If you pile hanging clothes up carelessly, you risk spending hours ironing them out later.
- Hangers can snag on other items: Those hooked edges love to catch on boxes, furniture, or each other.
- Clothes are heavier than they look: A bunch of clothes is surprisingly dense (especially things made of heavy fabrics like coats) and can crush softer items.
- It’s time-consuming: Packing each hanging item individually is slow and stressful, taking up precious time for other moving tasks.
The Easiest Ways to Move Hanging Clothes
Fortunately, there are simple methods you can use to save you hours during the packing process and prepare your hanging clothes for transport. Check out these tried-and-true hacks to pack hanging clothes for moving while protecting your belongings and skipping the frustration.
The Best Way to Move Clothes on Hangers: Trash Bags Over Hangers
If you’re looking for the easiest, cheapest, and most reliable solution for moving hanging clothes, the trash bag method is often your best bet. It’s quick, budget-friendly, and practical for most moves. All you need is a roll of trash bags and a handful of zip ties.
Here’s how to do it step by step:
- Divide your clothes: Separate your clothes into small groups of 10 to 15 hangers so they’ll fit comfortably in a bag.
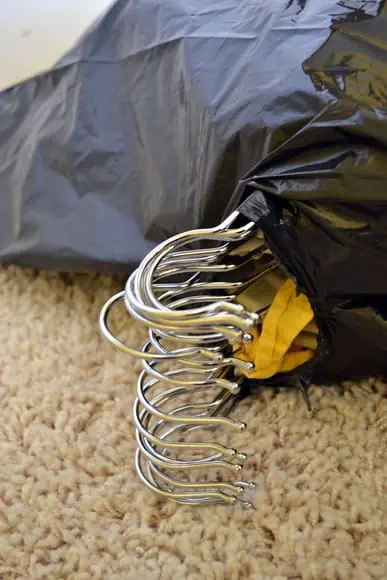
- Bag them up: Slip a large, sturdy trash bag over the clothes until only the hooks stick out before cinching it closed. Thick 30-gallon yard bags with drawstrings work best.
- Secure the hangers: Wrap two zip ties around the hooks (one on each side) to keep them aligned in a stack, making them easy to hang later.
The trash bag method is affordable, fast to set up, and protects your clothes from dust and dirt while keeping them together. But it’s not perfect. Bags can rip if they’re overfilled, and they might not provide enough protection during long-distance moves or in extreme weather.
Garment Bags
Garment bags are another solid option for hanging clothes, especially if you want a little more protection than trash bags can offer. They’re designed to keep clothes neat, covered, and wrinkle-free, making them great for valuable pieces or anything you don’t want to cram in a box. Think vintage pieces, leathers, furs, or important work outfits.
Here’s how to use garment bags for your move:
- Buy garment bags: Look for durable, breathable materials like canvas or nonwoven fabric. You probably want to skip the thin plastic ones, since those can tear easily. Pricing typically ranges from about $10-$30 per bag.
- Group your clothes: Sort your clothes into manageable chunks that’ll fit comfortably in each bag. Aim for 10 to 15 items.
- Load them in: Slide your hanging clothes into the bag and zip it closed, leaving the hangers sticking out of the top for easy access.
Garment bags protect clothing better during transit, especially delicate or expensive items. The trade-off? They cost more than trash bags, but if you can see yourself using them for storage down the road, they’re worth the investment.
Vacuum-Seal Hanging Bags
If saving space is your top priority, look no further than vacuum-seal hanging bags. These bags let you hang clothes inside, zip them closed, and then use a vacuum to suck the air out. The result? A compact, airtight bundle that protects your clothes from dust, moisture, and even odors.
Here’s how to use them:
- Buy the bags: Look for durable, leak-proof valves and double zip seals. Some bags also come with a built-in hanger pouch. Prices vary depending on the size of the bags, but expect to pay around $15 to $30 for a pack of 4 to 8. Keep in mind that cheaper versions can often lose suction in a shorter amount of time.
- Hang your clothes inside: Slide your garments into the bag, and arrange hangers into the dedicated hanger pouch. Make sure they aren’t overcrowded.
- Seal the bag: Zip it fully closed to lock in the garments.
- Vacuum the air out: Use a standard vacuum hose to remove air until the bag compresses around your clothes, forming a cozy cocoon for safe transport.
Vacuum-seal bags save tons of space and shield clothes from dust and moisture. They’re perfect for seasonal wardrobes or clothes you won’t need to unpack right away. However, they’re not great for large wardrobes since each bag only holds a small group of garments. They’re also ideal for storage or long-distance moves, but less convenient if you need immediate access to those items after moving.
Wardrobe Boxes

Wardrobe boxes are the gold standard for moving hanging clothes. These tall, sturdy boxes come with a built-in metal bar across the top. This means you can transfer clothes directly from your closet to the box without removing the hangers. It’s about as close as you’ll get to moving your closet intact, making this a great option if you have a lot of clothing.
Here’s how to use wardrobe boxes:
- Buy the boxes: Wardrobe boxes range widely in pricing, from about $15 to over $100, depending on size and material. Look for heavy-duty cardboard and a sturdy hanging bar either at moving supplies stores or home improvement retailers.
- Assemble them: Fold and tape the bottom of the box securely before sliding the bar into place at the top.
- Load your clothes: Transfer your clothes to the box directly on their hangers, spacing them out so the bar isn’t overloaded. If you have delicate items, wrap them in garment or trash bags for extra protection.
- Close and secure: Once the clothes are secure, tape the flaps shut to keep dust and dirt out.
Wardrobe boxes are convenient and keep clothes wrinkle-free, but they’re pricey compared to other methods and bulky to transport. You’ll also need to be mindful of how much weight the bar can handle since overloading can cause it to bend.
How to Transport Clothes on Hangers Once They’re Packed
Your clothes are bagged, boxed, or sealed up and ready to go. But packing is only half the battle. The real question now is: how do you actually get them onto the moving truck without ending up with a wrinkled, tangled mess?
The short answer: lay bags flat on top of packed boxes or mattresses, or hang them from a secured rod or strap inside the truck if you have one. Here are some more common ways to transport clothes on hangers once they’re packed.
Laying Clothes Flat on Boxes
One of the simplest ways to move hanging clothes is by laying them flat across the tops of sturdy, packed boxes. This method makes use of otherwise wasted space and stops your clothes from shifting during the drive.
The downside is weight. Large stacks of clothing can crush weaker boxes underneath, leading to wrinkles and possible damage. If you choose this option, make sure your boxes are taped securely and avoid overloading them with too many clothes.
Hanging Clothes Inside the Truck
If your moving truck allows, hanging clothes on bungee cords or straps is a great way to mimic a closet setup temporarily. This technique keeps clothes upright, wrinkle-free, and easy to unpack once you arrive.
“[Vacuum-seal bags are] perfect for seasonal wardrobes or clothes you won’t need to unpack right away. However, they’re not great for large wardrobes since each bag only holds a small group of garments.”
The key to success here is security. Cords that aren’t firmly anchored can come loose and cause clothes to fall mid-drive. Double-check that your straps are well-secured and you haven’t overloaded them with more weight than they can handle.
Laying Clothes Across Your Car’s Back Seat
For smaller wardrobes or delicate items, the back seat of your car can be a surprisingly good option. Laying clothes flat here keeps them separated from bulkier moving boxes and provides peace of mind knowing they’re within reach during the move.
However, space is limited, and stacking too many items can cause creasing. This method works best when you’re only transporting a handful of clothes or your most valuable pieces.
Pro Tips for Moving Clothes on Hangers
We’ve already covered the basics of packing hanging clothes for moving. That said, some extra planning and organization can help you save time on moving day and when unpacking later. Here are a few pro tips to make the process even smoother:
- Declutter first: Do yourself a favor and trim down what you’re moving. Fewer clothes (and other items) means you have less to move, and less to pay for. Sort your clothes into three piles: what stays on hangers (like dress shirts and jackets), what gets folded into boxes (items you wear less often), and what gets donated.
- Use painter’s tape to categorize: Color-code your closet before you start pulling clothes. For example, blue tape for shirts, yellow for jackets, and green for pants. It makes grouping items much faster and keeps things organized when unpacking.
- Group by type, not just by number: Before bagging, section off your clothing by category, such as shirts, jackets, pants, and dresses. Keeping similar items together makes unpacking and rehanging quicker and easier.
- Limit 10 hangers per group: Smaller groups are easier to handle and won’t crowd or crush the clothes inside a bag. It’s also less likely that hangers will bend or snag when you’re moving them around.
Considerations for Large or Expensive Wardrobes
When you’re moving a large or expensive wardrobe, the stakes get a little higher. You don’t want to risk damaging high-value items or wasting money on inefficient packing. Here are a few things to keep in mind:
- Skip the cheap bags: Designer suits, formal gowns, or delicate fabrics shouldn’t be shoved into plastic bags. Use garment bags or wardrobe boxes to keep them protected.
- Budget for volume: Hundreds of garments take up space fast, and wardrobe boxes can get pricey if you need a lot of them. Plan ahead so you’re not caught off guard.
- Prioritize care: Keep expensive or sentimental pieces separate from everyday clothes so they don’t get squished, wrinkled, or lost in the shuffle.
And if it’s feeling like too much, HireAHelper can connect you with movers who’ll handle the packing for you. It’s a big help for large closets — or anyone short on time, and while it may be an extra cost, the peace of mind knowing your items are in the hands of industry pros with the right experience is often worth it.