

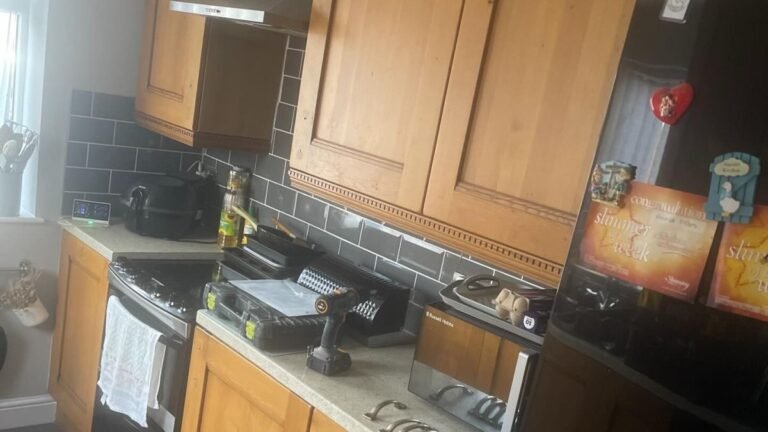


Solid oak cabinets covered both sides of this kitchen, with honey-toned doors above and below the worktops. Gray subway tile, beige counters, gray floor tile, a black sink, and dark appliances surrounded the wood.

Instagram creator @themobilespray kept the fitted cabinetry and changed its finish instead. The solid oak doors needed more than a coat of paint, since knots and cracks had to be filled before sanding began.
High-build primer prepared the wood for several topcoats in Brilliant White with a satin finish. The process changed the dominant surface in the room while retaining the raised-panel doors, decorative trim, cabinet boxes, worktops, backsplash, flooring, and appliances.
Solid Oak Covered Both Sides of the Kitchen

Honey-toned oak covered the base cabinets, drawers, and upper cabinets beside the range. Raised center panels and routed edges gave each door a detailed profile, while decorative molding ran beneath the wall cabinets.
Gray subway tile formed a dark band behind the wood, with beige worktops separating it from the lower cabinets. Gray floor tiles, a black range, stainless hood, and black refrigerator added more gray and black surfaces around the oak.
Cabinetry Continued Across the Sink Wall

More oak filled the opposite wall, where upper and lower storage surrounded the black sink. Tall wall cabinets extended close to the ceiling, putting large sections of exposed wood above the worktop as well as beneath it.
The cabinet boxes already fit around the window, sink, corners, and available wall space. Refinishing them preserved that configuration without bringing another cabinet style or door profile into the room.
Knots and Cracks Were Filled Before Sanding

Removing the doors exposed knots, cracks, and small marks that needed attention before spraying. Filler covered those areas before the fronts were sanded, including defects along the rails and corners.
Rows of detached doors were prepared away from the kitchen. Their recessed panels, routed lines, and solid oak construction stayed intact while the surface was prepared for primer.
High-Build Primer Created a New Base

Two coats of high-build white primer covered the prepared doors before the topcoat went on. More sanding followed the primer stage, creating a consistent base across the center panels, frames, edges, and repaired areas.
The white base also removed much of the contrast between individual pieces of oak. Grain, knots, and color variation no longer divided the fronts into separate wood tones, but the molded details remained visible.
Cabinet Boxes Stayed in Place

With the doors removed, the cabinet interiors reveal how much of the original kitchen was retained. Shelves, hinges, openings, and fitted storage remained in position while the exposed exterior surfaces received their new finish.
Oak still shows inside the cupboards, while white covers the visible face frames and side panels. Decorative molding beneath the upper cabinets was included in the respray rather than removed.
White Replaced the Honey-Toned Oak

Once reassembled, the same raised-panel doors form a much lighter bank of cabinetry beside the range. White now covers the uppers, base cabinets, drawers, end panels, plinths, and trim without changing their proportions.
Existing curved metal handles return to the painted fronts. The gray backsplash and beige worktops remain, so their relationship with the cabinetry changes without another finish being introduced.
Sink Wall Kept Its Existing Configuration

Paint continues across the opposite run, where the black sink remains centered beneath the window. Base storage sits below it while tall upper cabinets occupy the wall on each side.
The dark sink now forms a stronger contrast with the surrounding fronts. Gray backsplash tile connects the counter to the wall cabinets, while the beige worktop breaks up the white surfaces above and below.
Replacing the beige worktop and black sink could take the renovation another step, but their current finishes also show how a cabinet respray can change the room without requiring every surface to be replaced.
Raised Door Profiles Survived the Respray

Close views show the original door construction beneath the satin coating. Recessed center panels, narrow routed lines, and the stepped molding along the bottom of the upper cabinets remain visible.
Painting the cabinet sides along with the fronts creates a continuous finish around each unit. No exposed honey-toned edge interrupts the exterior where a door meets its cabinet box.
Dark Subway Tile Has More Contrast

Charcoal-gray subway tile now sits between white cabinetry around the range. Light grout outlines the rectangular tiles, while the stainless hood and black range add metal and dark surfaces to the same section.
Against the former oak, the backsplash shared the wall with another mid-to-dark finish. The painted fronts create a much lighter border without requiring the existing tile to be removed.
White Cabinets Frame the Black Sink

Across the sink run, three tall upper doors create a broad white section above the counter. Lower doors repeat the same raised-panel profile, connecting cabinetry on both sides of the black sink.
The window, faucet, backsplash, worktop, and sink remain recognizable from the original kitchen. Their darker and beige finishes now sit between painted cabinet fronts instead of large areas of exposed oak.
Decorative Trim Became Part of the New Finish

The molding beneath the wall cabinets contains a row of small rectangular cuts and several stepped edges. Rather than stripping away that detail, the respray carries across each groove and projection.
Metal handles add a darker accent against the door fronts without changing the hardware style. The result keeps details associated with the original solid oak cabinetry while removing its honey-colored surface.
Satin Paint Reaches the Edges and Side Panels

Close inspection around the hood shows paint continuing from the doors onto the cabinet edges, lower trim, and exposed side panels. Recessed sections remain defined rather than disappearing beneath the coating.
The stainless hood provides a clear break between the two upper cabinet groups, while gray tile fills the wall below. Those fixed elements make the change in the cabinetry easy to isolate from the rest of the kitchen.
Side-by-Side Views Show What Paint Changed

The comparison shows the same sink wall, cabinet arrangement, window, black sink, beige worktop, gray backsplash, and floor in both versions. Door sizes and raised-panel profiles also match from one side to the other.
What disappears is the large amount of honey-toned wood covering the room. Refinishing those existing oak surfaces turns the cabinets into a light backdrop for finishes that were already there, without replacing the fitted storage.
Image credits go to @themobilespray.