

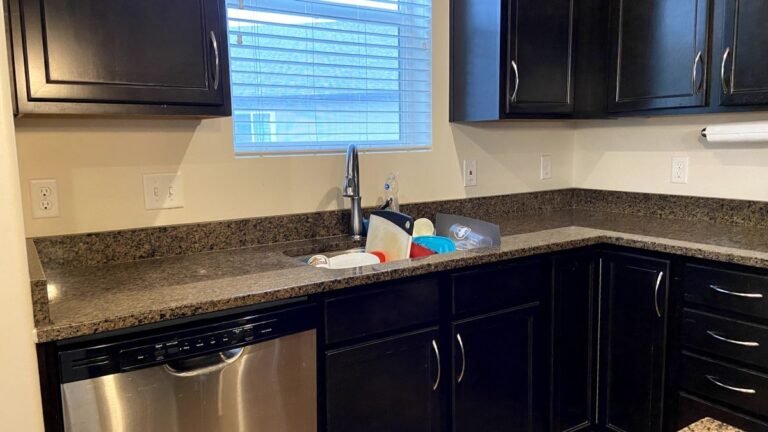

Dark cabinets draw the blame when a kitchen feels dim, yet this makeover leaves every door untouched. The change comes from removing a narrow granite border and introducing an old-school tile pattern that gives the existing finishes a different backdrop.

Michelle Carvalho, creator of Sunshine and a Summer Breeze, wanted more brightness in a kitchen with one small window without sacrificing the cabinets she liked. “I actually LOVE my dark cabinets,” she wrote, turning her attention to the wall above the counters.
Removing the four-inch granite strip allowed white subway tile to run from the countertop to the upper cabinets. Staggered rows and gray grout define the new backsplash, showing how a familiar pattern can change a room without replacing its most prominent feature.
The Original Granite Created a Border Above the Counter

Speckled brown granite covered the counters and continued a few inches up the wall. Above it, cream-painted drywall filled the space beneath the dark cabinets and around the sink window.
The short backsplash repeated the counter’s dense pattern at eye level. Keeping it beneath new tile would have left two separate finishes across the same wall, a division the homeowner wanted to remove.
Removing the Strip Gave the Tile a New Starting Point

The removal photographs show a heat gun beside the granite and a tool worked behind its upper edge to loosen the strip. The countertop remained in place, preserving the material across the kitchen’s work surfaces.

Once the granite and adhesive residue came off, the exposed wall extended down to the counter. White Satori subway tile arrived in mesh-backed sheets, with adhesive and spacers ready for installation.
The familiar tile shape was part of the appeal: a repeating white surface would contrast with the dark cabinetry without adding another dense pattern beside the granite.
Mesh-Backed Sheets Still Needed Spacers

Rows of tile covered the cleared wall in a staggered layout. Although the rectangles came attached to mesh, spacers were needed within and between sheets to hold the gaps at one-eighth inch.
The installation continued behind the range after the appliance was pulled out. Covering that section kept the backsplash connected across the cooking wall rather than leaving an unfinished area behind the stove.
Numbered Cuts Kept the Outlet Pieces in Order

Outlet openings broke through several rows, requiring cut pieces around their edges. Before renting a wet saw, the homeowner measured the gaps and assigned numbers to each location, then wrote matching numbers on the backs of the tiles.
The close-up shows one numbered piece alongside its marked position on the wall. That small planning step made the cut tiles easier to place once they returned from the saw.
Gray Grout Defined the White Rectangles

Natural Gray grout made the staggered pattern visible across the finished backsplash. It introduced a darker line around each tile, linking the new wall surface to the cabinets and the brown-gray flecks in the counter.
At the corner, the rows carry across both walls. Matching tile caulk finishes the changes of plane and the junction with the countertop.
The Window Became Part of the Tiled Surface

Tile trim outlines the window opening and finishes exposed edges. Beneath it, a white acrylic sill replaces the bare lower edge, giving the sink wall a defined transition between the window and backsplash.

The tile runs beneath the sill and around the outlet and switch covers. Removing the granite strip allowed those rows to reach the counter without a second border interrupting the white surface.
The Finished Backsplash Connects the Sink and Cooking Walls

From the front, white tile fills the band beneath the upper cabinets and continues under the sink window. The dark doors now have a contrasting background, while the granite remains the main pattern across the horizontal work surface.

Behind the range, the same tile reaches the underside of the microwave. Stainless steel appliances, silver cabinet pulls, and gray grout connect the cooking area to the sink side without introducing another finish.
The Cabinets Stayed Dark While the Kitchen Changed Around Them

The completed corner shows how much of the original kitchen remains: cabinet doors, handles, counters, appliances, and layout. White tile occupies the space between those elements, giving the room a brighter band at eye level.

The before-and-after comparison makes the change clear. The old granite border and painted wall give way to one tiled surface, with no cabinet painting involved. The homeowner reported that the kitchen felt brighter and larger after the backsplash was finished.
Would you change the backsplash before painting dark cabinets, or start with the cabinet color?
Images and project details: Sunshine and a Summer Breeze.