



Want to replace a dark kitchen without turning the room into another white cabinet remodel? This project removed matte black cabinetry and rebuilt the same kitchen around floor-to-ceiling walnut, black stone, integrated appliances, and an island that combines a raised work surface with a lower dining table.

The light wood flooring and three pendant lights remained through the project, but the cabinetry changed how the kitchen uses the walls. Walnut now stretches from floor to ceiling, black stone forms the counter and backsplash, and the island brings cooking, storage, wine refrigeration, and seating into one structure.
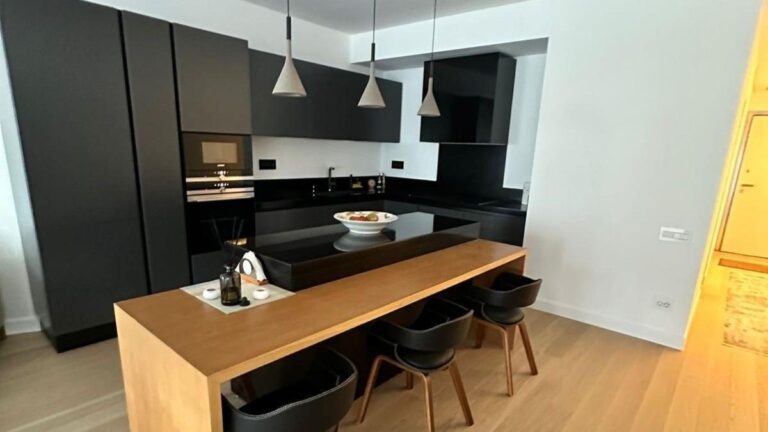
Black Cabinets Left Large Sections of White Wall Exposed

Matte black cabinets filled the back corner of the original kitchen, with tall storage on the left and shorter upper cabinets wrapping around the sink and cooking area. Large sections of white wall remained visible above and beside them.
A black island occupied the center, while a thick wood table surface extended toward the room with seating for four. The contrast between black cabinets, white walls, and pale flooring divided the kitchen into separate blocks rather than one continuous installation.
Original Island Combined Storage, Seating, and Wine Refrigeration

The first island already handled more than counter space. Flat black drawer fronts filled one side, while a glass-front wine refrigerator sat beneath the glossy black top.
The wood dining surface attached to the opposite side, giving the kitchen a place for four chairs without adding a separate table. The remodel kept this work-and-dining idea but rebuilt it around two defined levels and materials that connect with the new cabinet walls.
Removing the Cabinets Exposed the Kitchen Shell

Once the black cabinetry came out, the room was reduced to white walls, plumbing connections, outlets, mounting holes, and the existing flooring. Marks across the back walls trace the location of the former counters and cabinet runs.
The three pendant lights stayed overhead, and the light wood floor remained untouched. Keeping those elements provides a clear reference between the old kitchen and the new one.
Walnut Cabinet Boxes Began Filling the Back Wall

Installation started with walnut-toned cabinet boxes across the main work wall and a tall cabinet structure inside the recess on the right. At this stage, open boxes and exposed legs show how the storage was assembled before fronts, counters, and trim covered the construction.
The new layout uses more of the wall height than the former black kitchen. Tall vertical units establish the framework for appliances and storage that would later become part of one wood-covered elevation.
Built-In Appliances Sit Inside Tall Walnut Cabinetry

As the tall fronts went in, the relationship between appliances and cabinetry became clear. A coffee machine is set into the left cabinet bank, while an oven and another appliance occupy the tall unit across the room.
Walnut surrounds each black appliance instead of placing it against white wall space. Vertical grain runs across the full-height fronts, turning the appliance columns into part of the cabinet wall.
Walnut Wrapped the New Island Before the Stone Went On

The island took shape as a broad walnut structure positioned in front of the main cabinet run. Wood covers the long dining surface and drops down the end, creating a table-like frame rather than a standard countertop with an overhang.
A second structure rises through the center of the island. This becomes the higher black work surface, separating food preparation from the lower seating area without splitting the island into two pieces.
Black Stone Created the Raised Work Surface

Black stone with fine pale veining covers the raised center of the island. During installation, masking tape holds sections around the corners while the slab edges are fitted.
The dark stone connects the island to the black counter and backsplash on the wall behind it. Walnut forms the larger outer structure, while black stone marks the working surfaces.
Upper Cabinets Hide Open Shelving and Dish Storage

Before the upper fronts were installed, the cabinet interiors reveal a mix of shelves, compartments, and a metal dish rack. The storage spans much of the wall above the black backsplash.
The finished doors conceal these divisions behind broad walnut panels. Instead of allowing each cabinet box to create another line across the wall, the fronts reduce the number of visible breaks.
Walnut Doors Turn the Work Wall Into One Cabinet Elevation

Once the upper fronts were installed, vertical walnut grain runs across the cabinet doors from the black trim above to the backsplash below. Matching lower fronts continue the same wood beneath the counter.
The black backsplash occupies the center as a recessed horizontal band. Rather than using small tile or a contrasting painted wall, the dark slab creates a continuous work zone between the upper and lower walnut cabinetry.
Floor-to-Ceiling Walnut Expanded Beyond the Main Cabinet Run

The completed cabinetry extends across the adjacent wall, where tall walnut panels surround the built-in oven and continue toward the doorway. White wall space that once separated the kitchen from the rest of the room is now covered with wood.
This extension changes the scale of the kitchen more than a cabinet color swap could. Storage, appliances, wall panels, and doors read as part of the same floor-to-ceiling surface.
Two Levels Separate the Island Worktop From the Dining Surface

From the back of the island, the two-height design is easier to see. The black stone section rises above the walnut table, while drawers and a glass-front wine refrigerator occupy the working side below.
The lower walnut surface extends past the stone section to create the dining area. Its end panel reaches the floor, giving the seating surface the proportions of a table attached to the island rather than a counter with stools tucked underneath.
Concealed Lighting Defines the Walnut and Black Surfaces

Lighting beneath the upper cabinets illuminates the black backsplash and counter, while another strip runs beneath the base cabinetry near the floor. The island also gains light beneath the walnut dining surface.
Those lines separate the dark stone from the walnut around it. The black backsplash remains visible beneath the upper cabinets, and the raised island worktop stands apart from the wood table even though both belong to the same structure.
Black or Walnut: Which Kitchen Would You Choose?

The comparison puts two approaches to the same kitchen side by side. Before the remodel, matte black cabinets sit against white walls with a lighter wood table attached to the island. Afterward, walnut covers most of the cabinet wall, while black moves to the backsplash, counters, appliances, and raised section of the island.
Would you keep the original black kitchen, or choose the new walnut version with its floor-to-ceiling wood and two-level island?